
Whether for structural or finished flooring applications, timber offers durability, versatility and adaptability. The warmth, strength and natural beauty of timber flooring has proved enduringly popular in a wide variety of interior settings.
Timber flooring is a timeless product, offering a warmth and natural beauty largely unmatched by other flooring options. This article provides an overview of the installation of solid timber strip flooring over bearers and joists, timber based sheet flooring products and concrete slabs. Timber flooring is typically supplied as either solid timber or laminated wood products, made from layers of bonded timber. It fits together with a tongue and groove joint and once in place, is sanded and finished. There is a wide variety of species to select flooring from and the right species for a given application will be dependent on numerous factors. Information relating to species selection, environmental assessment, finish selection and recommended maintenance routines are all provided in this section.
Criteria Level: 1
Before planning your installation, you might like to read the manual Insulation Solutions to Enhance the Thermal Resistance of Suspended Timber Floor Systems in Australia
This section provides an overview to the recommended practices for laying timber strip floors over timber and engineered timber joists, structural sub-floors such as plywood, particleboard and over concrete.
Criteria Level: 1.01
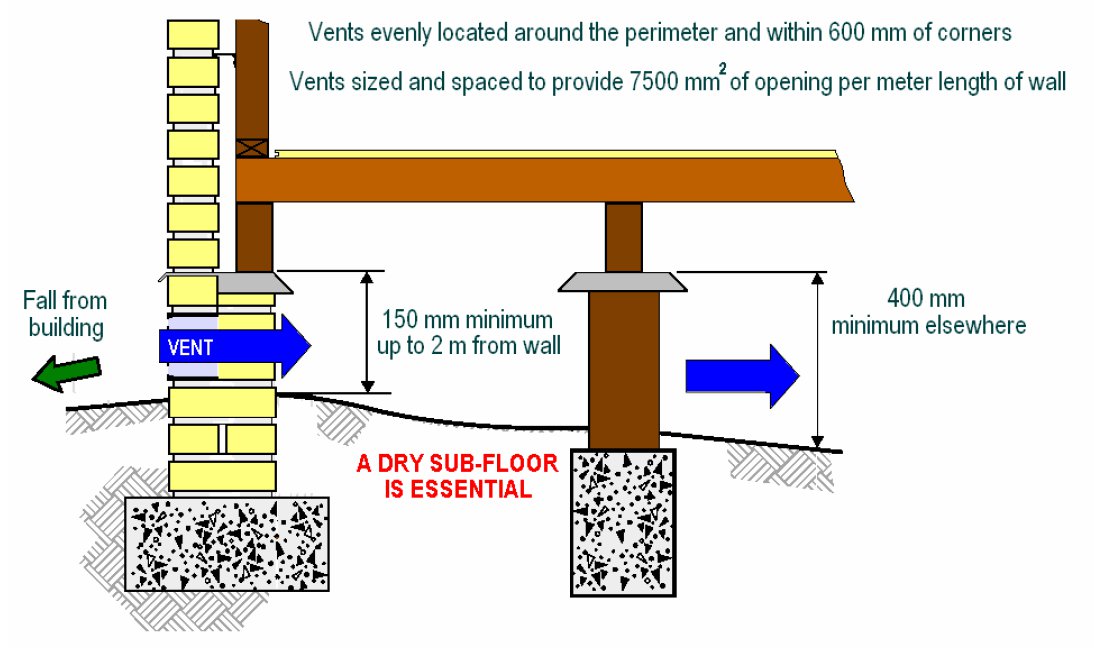
When laying a timber strip floor over joists, either directly on the joists or on sheet flooring fixed to joists, adequate sub-floor ventilation is essential for the performance of the floor
Tongue and groove floors should be provided with sub-floor ventilation that exceeds minimum BCA requirements. The levels outlined by the BCA are primarily focused on moisture uptake of the sub floor framing timbers, which can generally tolerate more moisture fluctuations than timber floors. The recommended minimum ventilation for tongue and groove timber flooring is 7500mm2 per metre length of wall, with vents evenly spaced to ensure that cross ventilation is provided to all sub-floor areas, as demonstrated by the following illustration.
Criteria Level: 1.02
The sub floor space must be kept free from all building debris and vegetation. The efficiency of the sub floor system will be reduced if anything prevents the free flow of air to and from the vents. If adequate natural ventilation cannot be provided a mechanical ventilation system should be installed. The drainage system of the site should ensure that water runs away from the sub floor space not towards or within it.
Criteria Level: 1.03
Applicable fixing requirements may differ between states and locations within each state due to the differing climatic conditions. In addition, specific methods may apply to certain proprietary products and these instructions should be strictly followed.
Top (face) nailing is a more robust fixing method than secret fixing and it can accommodate greater movement and expansion pressure without buckling. Secret fixing can be strengthened by increasing the amount of adhesive used. Where significant floor expansion is expected after installation the method of fixing chosen and associated spacing of fixings or amount of adhesive used requires specific consideration.
Criteria Level: 1.04
Fitted floors require a minimum 10mm expansion gap between floor boards and any internal or external wall structures, with the exception of doorways where the gap may be reduced to 1mm to allow a neat fit, without rubbing. For floor widths over 6m or where extra expansion is required, cramping pressure needs to be considered along with providing an intermediate expansion joint, or additional expansion gaps.
Criteria Level: 1.05
Boards should be checked to confirm they meet the moisture content, grade, size and profile requirements. Top face nailing should be undertaken uniformly with respect to edge distance and alignment across the floor. When laying over a structural sub floor such as plywood or particleboard it is important that fixing is adequate. In some moderately humid conditions nail and adhesive fixing has proved inadequate. In these cases screw fixing to the joists will provide a stronger system.
When laying over sheet flooring or an existing floor, boards should be staggered to match the look of the floor they are covering. It is good practice to ensure that end joints are at least 450mm apart and that joints do not cluster together or align. Installers should consider how the boards should distribute in terms of length, colour and grade features. It may be necessary to lay boards from more than one pack at a time so the colour range is blended well throughout the floor.
Criteria Level: 2
Fitted floor construction must be used in instances where the timber floor is to be a feature floor and therefore sanded and polished. In these cases, the timber flooring is installed after the roof cladding and external wall cladding are in place and the building weather tight.
Criteria Level: 2.01
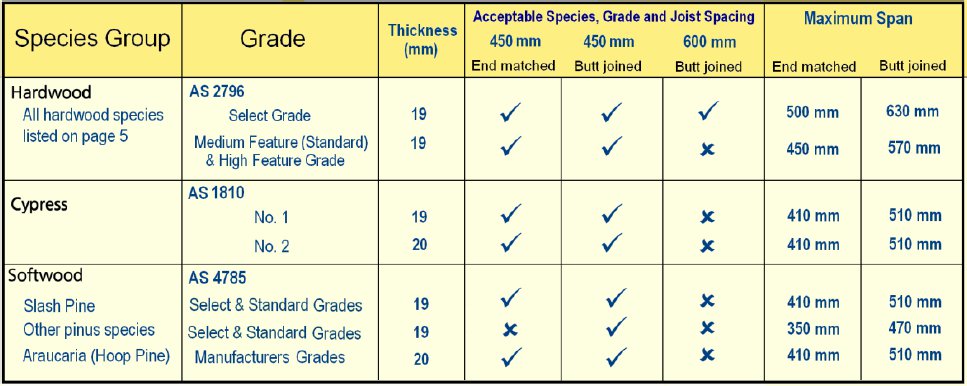
AS1684 Residential timber framed construction specifies the necessary size of timber members used to support timber flooring. For end-matched flooring profiles, joists with a minimum thickness of 35mm may be used. Where plain end flooring is butt joined at floor joists, 45mm or 50mm thick joists are recommended.
- For secretly nailed flooring over joists, the joists must be seasoned timber or Cypress. If the joists shrink away from the floor, movement of boards on the fixings is likely to cause excessive squeaking.
- Top (face) nailed floors may be fixed into either seasoned or unseasoned joists. If unseasoned, the joists need to be of a single or similar species not exhibiting high rates of shrinkage.
The joists must be sufficiently flat to accept the timber floor and to provide a smooth and even finished floor appearance. The allowable span of timber flooring is dependent on the timber species, density, grade, thickness and whether or not the flooring is end matched. Click on the table below to see the acceptable joist spacing and maximum spans for various flooring products when fixed to timber joists.
Criteria Level: 2.02
When laying boards over joists the vast majority of boards should be supported on at least three joists. Flooring should be laid in straight and parallel lines. Butt joined boards must be cut to join over floor joists and joints in adjacent boards should be staggered. End-matched joints in adjacent boards should not occur within the same span between joists. As a general rule, cramping should be sufficient to bring the edges of adjoining boards together while maintaining a straight line.
Criteria Level: 2.03
Boards for top (face) nailing with cover widths of 65mm or less should be nailed with one or two nails at each joist. Those over 65mm and up to 135mm wide should be nailed with two nails at each joist. For those wider than 135mm, two or three nails at each joist is recommended.
Top (face) nailing should be undertaken uniformly with respect to edge distances and alignment across the floor. Some variation due to joist layout may occur. Boards for secret fixing up to 85mm wide can be secretly fixed with a staple or cleat at each joist, combined with ample coverage of flooring adhesive to the joist. In humid and moist locations, additional adhesive will be required to cater for likely expansion. For some geographic locations top (face) nailing is the preferred option. Recommended fixing sizes are outlined in the table below.
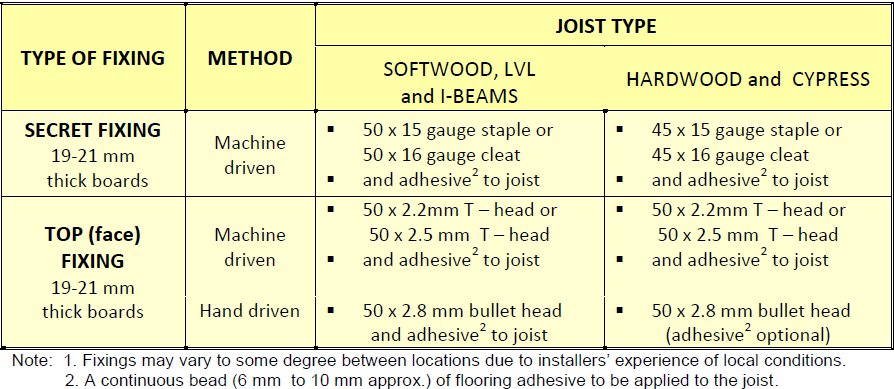
Recommended minimum edge distances for nailing at butt joints or board ends is 12mm. All nails, including machine nails, should be punched a minimum of 3mm below the top surface. During fixing the joint between floor boards and the joist surface should be checked for gaps. Where present, nails should be punched to draw boards tightly onto the joists.
Criteria Level: 3
Timber tongue and groove flooring can be laid over an existing timber floor or sheet floor (plywood or particleboard) on joists. Where the existing floor is structurally sound, overlay flooring (11mm to 14mm thick) or structural flooring (19mm to 21mm thick) can be laid. Floors can either be fixed through the sub floor into the joists or into the existing floor only.
In instances where there is doubt over the structural adequacy of the existing floor, either:
a) Remove the existing floor and use structural flooring laid at 90° to the joists, and fix into the joists; or
b) Replace the defective boards or sheets to make the existing floor structurally sound.
Top nails in existing flooring should be re-punched where necessary and if required the entire floor rough sanded to provide an appropriate surface for the fixing of the new floor.
Check the existing floors moisture content and investigate and address any issues prior to installation of the new floor. Adhesives require a clean, structurally sound floor that is free from surface moisture, loose particles and contaminants. Immediately prior to laying, the new floor should match or be close to the moisture reading of the existing floor.
Criteria Level: 3.01
The methods outlined below are suitable for board widths up to 135mm for both overlay and structural flooring.
The secret fixing of boards requires one staple of cleat at the appropriate spacing. For top (face) nailing of boards through the sub-floor and into the joists two nails per board are required at each fixing for boards exceeding 65mm cover width. Some manufacturers have specific fixing recommendations for their products and these should be strictly adhered to.
Expansion gaps of 10mm minimum should be provided at all walls and other fixed obstructions, which are parallel to the run of the floor. Intermediate expansion joints should be provided in larger floors to give an equivalent gap of 10mm every 6 metres or alternating boards should be loosely cramped.
Secret fixing into sub floor (substrate) only: When relying on the sub-floor or substrate for fixing, boards should be secretly fixed with the first and last few boards that do not allow secret fixing, top face nailed. When laying over an existing tongue and groove sub-floor the new flooring may be laid either parallel or at 90° to the existing boards, provided the sub-floor is within the required flatness tolerances.
To minimise possible squeaks, when fixing boards with a maximum width of 85mm, use beads of adhesive to provide a cushion between the two floors. This is best achieved by using a continuous bead of adhesive at 90˚ to board length, midway between fixing points. Where flooring adhesive is used to provide more of the fixing, staples or cleats may be spaced up to 450 mm apart with beads of adhesive at the fixing points and midway between.
With wider flooring up to 135 mm, a full bed of adhesive with fixings up to 300 mm apart is applicable. For 19 mm thick flooring, staples for boards up to 85 mm wide should be a minimum of 32 x 15 gauge and cleats should be a minimum of 32 x 18 gauge. For wider boards to 135 mm x 19 mm, 38 mm x 15 gauge staples or 38 mm x 16 gauge cleats are recommended. For overlay flooring which is generally up to 15 mm thick, 25 mm long fixings are commonly used for all widths. Fixing is also required within 50 mm of board ends, however if too close splitting at ends may occur.
Top (face) nailing through the substrate floor: When structural 19 mm flooring is used, the floor should be top (face) nailed with 65 x 2.5 mm machine nails or 65 x 2.8 mm hand driven nails through the existing floor and into the joists. For thinner overlay flooring, 50 x 2.5 mm machine nails or 50 x 2.8 mm hand driven nails should be used. In all cases, continuous beads (6 mm to 10 mm approximately) of flooring adhesive should be provided at the joists and midway between them to provide a cushioning effect between the two floors. Board ends adjacent to walls should be fixed with flooring adhesive and nailed to the sub-floor.
Criteria Level: 4
The methods outlined below are typically suitable for board widths up to 135mm wide. Structural flooring may be used on battens and plywood and overlay flooring on plywood only.
The secret fixing of boards requires one staple or cleat at the appropriate spacing. For top (face) nailing of boards to the batten, two nails per board are required at each fixing for boards exceeding 65 mm cover width.
Some manufacturers do not recommend that their 130 x 19 mm or wider boards be secretly fixed and other manufacturers have specific fixing recommendations for wider flooring that should be strictly adhered to.
Criteria Level: 4.01
Prior to installation it is important to ensure that the concrete is sufficiently level to accept the flooring. Where there is a deviation of more than 3mm within a 1.5 mm length a concrete levelling system should be used. In accordance with AS2780, slabs on ground should be constructed with a continuous under slab vapour barrier. Flooring should not be laid until the concrete slab meets all necessary assessment requirements.
Criteria Level: 4.02
For top (face) nailing to battens, boards exceeding 65 mm cover width require two nails per board at each fixing. Gaps of 10 mm minimum should be provided at all walls and other fixed obstructions, which are parallel to the run of floorboards. Intermediate expansion joints should also be provided in larger floors (width at right angles to boards exceeding 6 meters), to give an equivalent gap of 10 mm every 6 meters (approx. 1.5 mm every 800 mm).
As an added protection against moisture from the slab or minor building leaks a 0.2mm thick polyethylene membrane is recommend. The membrane should be lapped by 200mm, taped at the joints and brought up the walls to or just above the intended surface of the flooring, where skirting can cover it. Note that the membrane should not be effected by the fixing of plywood sub-floors or battens through the polyethylene.
Criteria Level: 4.03
Plywood sub-floors should be structural grade, a minimum 15 mm thick and with a type A bond. Sheets may be installed in a brick pattern or at 45˚ to the direction of the strip flooring, with a minimum 6mm gap between sheets and a 10mm gap to internal and external walls. Generally the plywood is fixed to the concrete. Where this cannot occur, the sheets are laid at 45˚ to the direction of the floorboards and the end joints of the plywood sheets are staggered. There is a variety of fixing methods available.
The optional method detailed below is for hand-driven spikes, which has proven to provide solid fixing to the slab:
- Fix plywood sheets through the membrane to the slab with hand driven 50 mm long by 6.5 mm spikes. A minimum of 20 spikes should be used per 2400 mm x 1200 mm sheet, equally spaced (4 rows of 5 spikes down the length of the sheet) and with the outer spikes 75 mm to 100 mm from the sheet edge.
- The fixing of the floor may then be undertaken relying on a combination of mechanical and adhesive fixing.
When fixing boards with a maximum width of 85 mm at close centers up to 225 mm, lay beads of adhesive to provide a cushion between the two floors to improve acoustic performance.
With wider flooring up to 135 mm, a full bed of adhesive with fixings up to 300 mm apart is applicable. For 19 mm thick flooring, staples for boards up to 85 mm wide should be a minimum of 32 x 15 gauge and cleats should be a minimum of 32 x 18 gauge. For wider boards to 135 mm x 19 mm, 38 mm x 15 gauge staples or 38 mm x 16 gauge cleats are recommended. For overlay flooring which is generally up to 15 mm thick, 25 mm long fixings are commonly used for all widths. Fixing is also required within 50 mm of board ends, however if placed too close splitting at ends may occur.
Criteria Level: 4.04
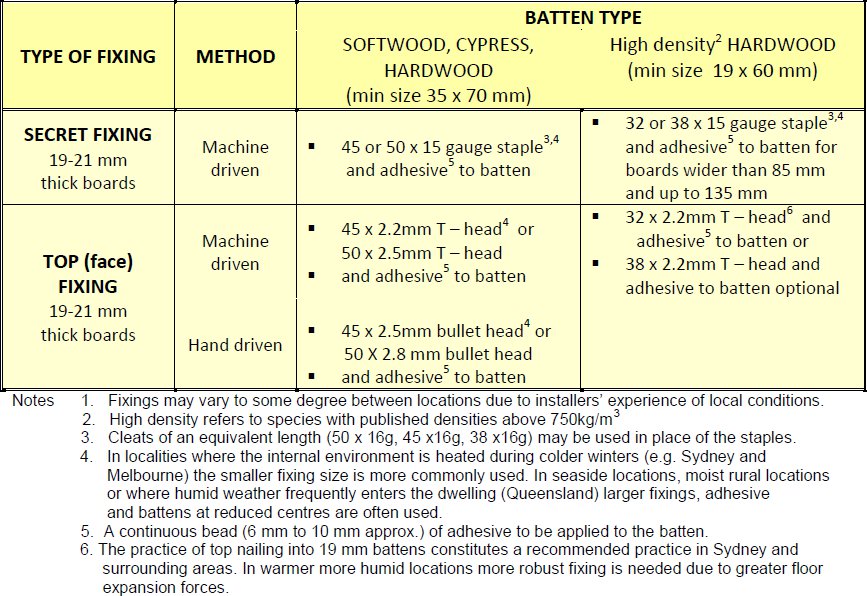
Battens should be either seasoned hardwood or softwood, fixed to the slab using 75 x 6.5 mm gun nails at 600mm maximum spacing. Fasteners with a minimum embedment of 32mm at 900mm maximum spacing or M6 masonry anchors at 900mm maximum spacing should be used. Batten spacing is dependent on the species and grade of timber flooring used and the spacing should be as per spacing for strip flooring over joists. Where higher expansion forces are anticipated, batten spacing is often reduced to create a stronger fixing system. If battens are a minimum of 35mm thickness, the spacing between fastenings may be increased up to a maximum of 1200mm provided minimal floor expansion is expected.
Boards for secret fixing up to 135 mm wide can be secretly fixed with one staple or cleat at each batten. Adhesive is recommended for board widths greater than 85 mm and often used with boards up to 85 mm wide. Boards for top nailing and cover widths of 65 mm or less should be top nailed with one or two nails at each batten. Boards for top nailing and a cover width of 80 mm and up to 135 mm wide should be top nailed with two nails at each batten. Boards wider than 135mm are generally top nailed with two or three nails into thicker battens. Top (face) nailing is to be undertaken uniformly with respect to edge distances and alignment across the floor. Some variation due to batten layout may occur.
In warmer, humid or moist localities, additional care is required to cater for possible greater expansion. Therefore particular consideration should be given to board moisture contents, providing for expansion, board size, the species and fixing method.
Click on the following table and to view the minimum batten size and fixing recommendations for structural 19-21mm thick flooring to battens.
Criteria Level: 5
The direct adhesive fix method requires a greater knowledge and understanding of concrete properties, leveling compounds, moisture vapour barriers and adhesive performance, than the methods described previously. One of the main advantages of this method is that it can overcome possible height restrictions and it is the method necessary with pre-finished flooring.
Specific practices differ throughout Australia. In Western Australia, the Australian Timber Flooring Association have specific best practice' guide which provides information on practices and floor acceptability in that state. Some provisions may differ from the general information provided here.
Criteria Level: 5.01
Most adhesive manufacturers will specify the slab assessment requirements for their product and these differ between providers.
Aspects common to all assessments are outlined below.
1. Slab moisture.
It is critical that slabs are sufficiently dry to accept the flooring to avoid cupping, inadequate adhesion and expansion related issues that may arise from moisture redistribution after the floor is laid. Moisture vapour barriers can provide added protection.
2. Surface contaminants.
The surface must be completely clean dry and free of any kind of contaminant. Water droplets on a slab should freely soak into the surface. If not the presence of a sealer is likely, and this will need to be removed.
3. Slab construction and soundness.
New slabs should all be constructed to meet AS2870. Adhesive fixed timber floors can fail if the slab is not strong enough. If suspected the surface should be tested for weakness and hollow sounds. Any weak material needs to be removed and repaired.
4. Flatness and levelling.
Flatness provisions differ between adhesive manufacturers but the general rule is a required flatness of 3mm in 3m. Self-leveling compounds may be required to level the slabs. Alternatively, high spots may be ground off. If a moisture vapour barrier is required it is usually applied beneath the leveling compound.
5. Bond testing.
If there is uncertainty over slab integrity, bond testing can be beneficial. This is where half the length of 300mm long pieces of flooring are glued to the slab and after 24 hours levered up to ensure sufficient strength and appropriate failure. The flooring should not be easy to lift and once lifted, failure through the adhesive and the timber is expected with minimal failure to the slab.
Criteria Level: 5.02
The purpose of a moisture vapour barrier is to reduce to a sufficiently low level any residual moisture migration from the slab so that the timber flooring above is unaffected. Many adhesive manufacturers also manufacturer a compatible moisture vapour barrier or will advise what moisture barrier is recommend with their product. Moisture vapour barriers are not mandatory but may be required for some warranties.
Criteria Level: 5.03
Most of the adhesives on the market for direct stick flooring are one part moisture curing polyurethane products. Products differ between manufacturers in their properties and their application process. All major manufacturers provide data sheets for the use of their products and these should be followed carefully.
Adhesives provide significant restraint to board movement but for some Australian hardwoods swelling forces will exceed that of the adhesives. Consequently, irrespective of how flexible an adhesive is, a similar amount of movement often occurs with higher density species. Peaking can also occur in locations where expansion pressure is higher.
Criteria Level: 5.04
Direct stick installation practice differs throughout Australia in correspondence to varying humidity levels. The practices most commonly adopted by location are outlined below.
Practices in the eastern states of Australia
In addition to the slab preparation points discussed above, it is important to ensure that the partially cured adhesives on the trowel do not lessen the required spread rate or height of the adhesive. Adhesive height is essential in ensuring bonding with variations in slab flatness.
For visual and expansion reasons, boards are generally laid parallel to the longest wall in the room or where boards will run lengthwise down hallways. Temporarily fix the starting board with adhesive and concrete nails, with the tongue facing the starting wall. Ensure that the starting board remains in firm contact with the adhesive until the adhesive has cured.
At both ends of the floor a 10mm expansion allowance gap must be provided. When using adhesive only use an amount that can be spread within 20 minutes. Adhesive manufacturers recommend that the adhesive generally be spread at right angles to the edge of the board. Take care to ensure the correct spread rate and adhesive height is maintained throughout.
Beginning from the area between the starter wall and starter board, commence installing the floor left to right from the end wall, maintaining the required expansion gap. Lay the first row of boards away from the starter wall by slotting the tongue of each board into the groove of a started board and then press the board firmly down into the adhesive.
In the first row, each board is laid until the wall is reached where the final board will need to be cut to fit, taking into account the required expansion gap. A board whose off-cut is long enough to be used at the start of the next row should be chosen. Use a block to gently tap together the completed row to ensure a snug fit. Continue to lay the floor from left to right. To ensure a relatively even weight distribution, temporary pinning should be addressed every 800mm approximately.
To achieve the most visually appealing floor, it is good practice to ensure that end joints are at least 450mm apart and not clustered together or aligned. When the wall opposite the ‘starting wall' is reached, the final board should be scribed and cut, again making sure the required expansion allowance is provided along the full length of the wall. Once this main section is laid, the area near the starting wall can be completed. After a period all temporary fixing can be removed and sanding can generally commence after 3 days.
Practices in Western Australia
In Western Australia practices differ. In addition to a full bed of adhesive beneath the floor, concrete nails approximately 3mm in diameter provide mechanical fixing through the top surface of the boards. The nailing is placed randomly throughout the floor and particularly in any areas where drummy spots are identified. Careful colour matching of the filler results in nails blending well with the floor.
Criteria Level: 1
Preparing the floor for sanding is a key step in the finishing process. Attention to the areas outlined below will ensure the sanding process is completed efficiently and effectively on the first occasion.
Assessing the floor prior to sanding: The assessment process should include checking vertical movement at joints, degree of cupping and gapping and signs of moisture. If there are signs of abnormal moisture a moisture level reading should be taken. Before sanding takes place, it is advisable to let the floor ‘settle' for a period of 3 to 14 days.
Punching nails and filling nail holes: To protect the sanding equipment ensure that all nails are punched a minimum of 3mm below the surface of the boards. The punched nail holes can then be filled with an oil or non-oil based filler. The colour of the filler should be carefully selected to minimise any visual impact of the nail. Note that many of these products are sold in colours pre-matched to particular species.
Filling can be done now or after the first coat of finish is applied. The latter option can be preferable as it minimises the potential for the filler to impact the surrounding timber. In all cases make sure the filler completely fills the nail hole.
Cleaning: The floor must be thoroughly cleaned to remove all traces of dirt, grit and debris. If not removed, these particles can cause deep and uneven scratching in the timber surface, requiring substantial sanding to remove. The floor should first be carefully swept, then vacuumed. Lastly ensure that any materials like sealants, which may have dropped on the floor, are completely removed.
Protection: During the entire sanding and finishing process it is critical that access to the flooring be restricted. Care must also be taken to ensure dust does not re-enter the flooring area.
Criteria Level: 2
The sanding process depends on the condition of the floor and the hardness of the flooring timber. In cases where the floor is being sanded for the first time the process will be made up of a number of separate stages. These stages typically start with a course paper and eventually progress to a fine grade of paper, as outlined below.
Stage 1 - Level sanding: The level sanding stage provides for a level, completely sanded floor. This process involves cutting the boards to level and taking out any ridges or high points in the floor. Later stages will remove any scratches generated by this initial rougher style of sanding.
Stage 2 - Edging: An edge sander is required for corners, edges and small areas that need to be sanded level but cannot be reached by a sanding machine. Care is necessary to ensure the process does not dig grooves into the boards and that the finished edge remains level with the body of the boards.
Stage 3 - Finish sanding
Initial cuts: The initial cuts stage utilises a finer grade of paper than earlier stages and the floor is sanded in the direction of the grain. The purpose of this stage is to smooth off the ‘initial cuts' or coarse sanding marks left by the level or basic sanding process.
Final sand: Once a suitable level of smoothness is achieved the final sand can be completed. This stage utilises an even finer grade of sand paper again to prepare the floor for coating. Once sanding is complete, the floor must again be fully cleaned to remove any traces of dust and grit that may interfere with the coating.
Criteria Level: 3
Timber floor finishes can be grouped into four main categories:
- Penetrating oils and waxes,
- Curing oils and alkyds,
- Oil modified urethanes
- Polyurethane
The latter three categories are available in solventborne and waterborne. Performance varies significantly within categories and across categories. Gloss level options range from very high gloss to matt corresponding with the huge range of choice available on the market.
Criteria Level: 3.01
These are a blend of natural oils and waxes with added chemical drying properties. Some of the lowest volatility types meet the Green Building Council of Australia volatile organic compound (VOC) emission guidelines. This type of coating is one of the more economical options and is often favoured due to the natural look it generates. With ageing the coating will darken significantly and will be slow to cure in cold weather. It is also a coating that requires a high amount of maintenance.
Criteria Level: 3.02
Curing oils are oils dissolved in mineral turpentine with added chemical curing agents called metal driers. They are low cost, are of good edge bonding resistance and produce a rich timber colour. However, compared to other coating types, durability is low and recurring maintenance with the use of metalised acrylic polishes is required.
Alkyds are produced from reacting curing oils with synthetic resin and dissolving them into sprit based solvents. This results in a durability improvement from a low to moderate level. Alkyds are another low cost option providing good bonding resistance and a rich timber. A medium level of maintenance is necessary.
Criteria Level: 3.03
These spirit based solventborne coatings combine oil with a smaller amount of urethane. With a higher urethane proportion, durability is higher but flexibility and resistance to edge bonding, lower. Gloss levels vary from high gloss to satin. Waterborne oil modified urethanes are also available on the market. They are higher in cost but offer lower VOC emissions. All oil modified urethanes yellow with age and are slow curing in cold weather.
Criteria Level: 3.04
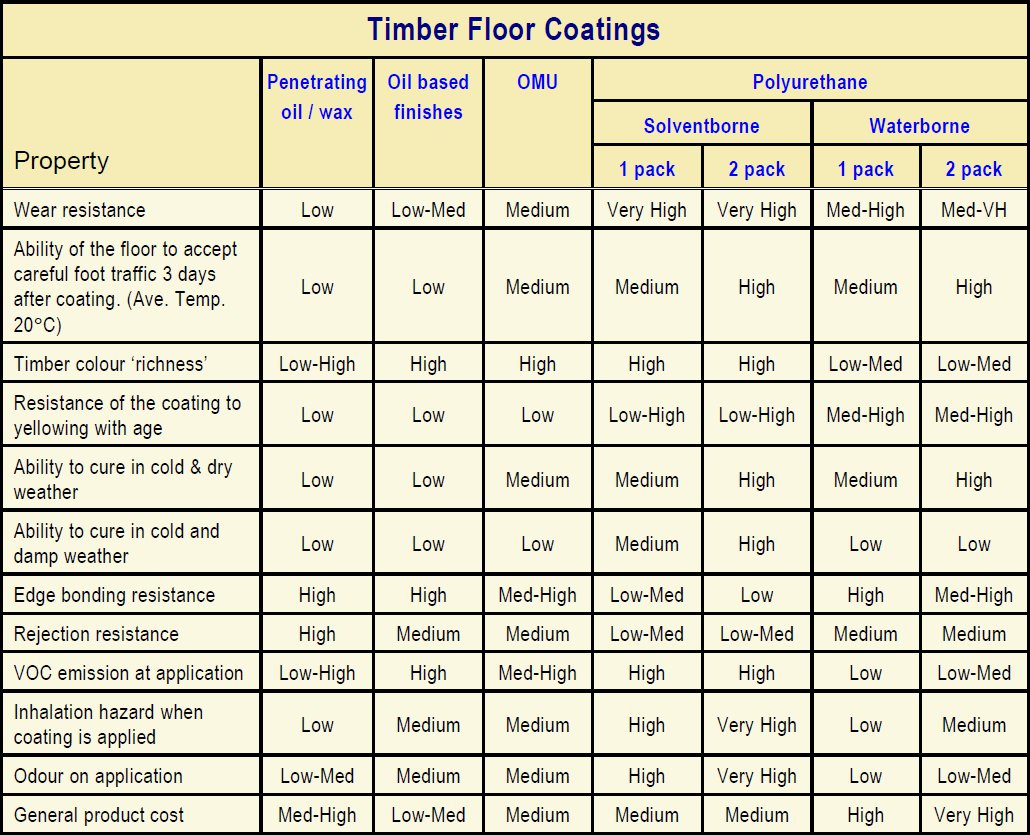
This coating type is the most popular and common in Australia. It provides the highest durability and film build (% solids) as well as the highest gloss levels. Additionally it can be used with fast dry sealers and provides the best wear resistance resulting in lower maintenance. It is of an intermediate cost and generally provides the most trouble free application. On the negative side it has the poorest edge bonding resistance and there is a strong solvent smell on application. Until the coating is cured it of the highest toxicity however with correct ventilation and use of protective equipment this should not be a major issue.
Criteria Level: 3.05
This has the widest range of sub categories and as a result there is a spread of properties from poor, to as good as solventborne polyurethane. Matt through to gloss finishes are available and they darken less than other coating types with time. With the absence of the strong solvent smell these coatings are viewed as a healthier, more environmentally friendly option and good edge bonding resistance make them an increasingly popular choice. They are however typically the most expensive product category on the market and depending on the sealer can create a lighter timber appearance.
Criteria Level: 3.06
Click on the following table for an overview of the types of finishes available and their corresponding properties.
Criteria Level: 4
After initial curing, and until the coating system has hardened, the floor may be used minimally. The hardening process can take up to two weeks and during this period it is recommend rugs and hard furniture are not laid on the floor. Light furniture with the protection of felt pads to the ends is ok, keeping in mind that the use of the floor before the full cure has been realised can result in a floor more prone to scuffing and scratching.
Criteria Level: 5
Timber floors always benefit greatly from regular care. The frequency of this care will depend on the selected coating and the frequency and severity of the area's use. At some point the floor will need to be rejuvenated through a process of buffing back and re-coating. Some of the softer floor finishes will benefit from the application of a metalised polish that will increase durability.
Criteria Level: 5.01
Sand and grit bought into a home or building from footwear can be damaging, acting like sand paper against the floor. In high wear areas, rugs can be a good option to minimize this effect, while also enhancing décor. Mats placed outside and inside external doors will also assist.
Direct and intense sunlight can contribute to gapping and cupping of boards. It will also cause the colour to change with time. Filtered sunlight through shades or curtains will slow this process and some specific finishes are more effective than others in averting colour change caused by sunlight.
Criteria Level: 5.02
A regular cleaning program will greatly assist in keeping floors in pristine condition.
- Water can significantly damage timber flooring so any spills should be mopped up immediately and any leaks investigated without delay.
- Timber floor cleaners are available to remove scuff marks and stubborn stains but always give preference to the cleaner recommended by the coating manufacturer.
- An antistatic mop provides the most gentle and efficient means of collecting grit and dust. Where vacuum cleaners are used, regular inspection is required to confirm the ongoing softness of the bristles. Steam mops are not recommended.
- On a monthly basis damp mopping with a neutral pH wood floor cleaner is recommended. Finish the process with use of a dry mop to remove any excess moisture.
Criteria Level: 5.03
To determine if recoating is necessary the flooring should be inspected in the most high wear area. Place a few drops of water on the surface and if the water beads, the finish is still intact and the flooring should only require cleaning. However, if after a few minutes the water begins to soak through and the timber colour darkens, then the finish is partially worn and recoating is recommended.
Criteria Level: 1
Unless tongue and groove timber flooring is in a permanently controlled environment it will always move in response to changing environmental conditions.
During dry, less humid weather, gaps will appear between floorboards where the floor has shrunk. During more humid temperatures boards will expand showing fewer, smaller gaps. Localised shrinkage may occur where boards are exposed to heat sources such as fireplaces or direct sunlight. The amount and rate of movement depends on the species and the cutting pattern of individual boards.
Gapping across a timber floor should be expected and may be relatively even, but actual gap size will vary between individual boards. Wider boards usually move more than narrower boards making gaps between these boards more noticeable. Uneven gapping can detract from the appearance of the floor and this can occur when a number of boards are bonded together by the finish entering the joints. Floor finishes will not prevent timber movement but may reduce how quickly a floor responds to climatic changes.
Criteria Level: 2
Every site requires assessment prior to the installation of timber flooring. Relative humidity is a major influencer in determining whether a floor will expand or shrink. If the moisture content of the timber flooring is close to the average in service moisture content then subsequent changes in humidity will only result in small changes in flooring moisture levels.
Timber flooring is generally manufactured to suit climates with average external equilibrium moisture contents (EMCs) of 12% to 14%. Installation and finishing practices need to consider accommodating both the adjustment to climatic conditions through artificial heating and cooling and the seasonal movement that will occur in the climate naturally.
Criteria Level: 2.01
Greater allowance for floor expansion is required for floors installed in homes located in ‘moist' environments. Such environments include homes of higher elevation than coastal areas, homes built in bushy surroundings or gullies, and homes in rural settings, particularly coastal and hinterland areas that experience higher than average rainfall.
Criteria Level: 2.02
A lack of sufficient ventilation in the sub floor space can result in high humidity, which will in turn cause expansion and cupping of floorboards. Where humidity is constantly high, coatings to the underside of boards will not reduce the moisture uptake of the flooring. Dense gardens and landscaping around the sub floor may also cause increased moisture content and reduced airflow through the sub floor space. Note that quoted figures for sub-floor ventilation are based on sub-floor space that is uninhibited.
Criteria Level: 2.03
Care should be taken when timber flooring is laid on joists with an open sub floor, particularly when built on steeply sloping land. In such locations, very dry winds or wind blown rain and fog can directly affect the moisture level of the floor, causing extreme shrinkage or swelling. In cases of extreme swelling the floor can lift off the joists and cause structural damage to the building.
Depending on the severity of the weather exposure, options to protect the flooring include the provision of oil based sealers to the underside of the flooring, installation of a vapour resistant lining to the underside of the joists or enclosing the underfloor space.
Criteria Level: 2.04
Within a home a number of differing ‘mini climates' can develop causing aspects of flooring to respond differently within the same dwelling. Examples of where these ‘mini climates' are likely to occur are areas directly exposed to glass windows, fireplaces, refrigerators and air conditioners. The aspect of the house and two-storey construction will also effect the internal environment. Note that when floors are exposed to sunlight through large glass areas, protection should be considered before, during and after installation.
Criteria Level: 3
Timber floors will both feel and sound different depending on the sub floor system on which they rest. Generally timber floors laid over joists or battens will have more spring underfoot and some slight vertical movement at board edges and end matched joints. Squeaks can be expected from most floors of this type and are often more prevalent during drier weather due to loosening at the joints.
Floors that are laid over plywood on a slab will have a firmer feel underfoot and some areas may sound ‘drummy'. This effect is similar for floors glued directly to concrete.
Where slab heating is present, substantial seasonal movement can be expected. While strip flooring can be used, engineered timber flooring products may be preferable as less dimensional changes can be expected.
Criteria Level: 4
With respect to sound transmission timber flooring is no different to other hard flooring surfaces and will freely transfer impact sounds. To ensure a floor system that meets sound performance requirements, careful attention to the detailing and installation practice is necessary. Note that some building regulations will often apply restrictions to sound transmission between apartments and units.
Criteria Level: 5
The following outlines key elements requiring specific consideration prior to the installation of timber flooring.
Criteria Level: 5.01
Once delivered on site, timber flooring products must be protected from weather exposure and other sources of moisture and damp. On-site storage of timber flooring should see the timber flooring contained within its plastic wrapping and stored under permanent cover with sufficient ventilation. Inadequate storage can result in water marking, moisture absorption and distortion of the boards.
Criteria Level: 5.02
Prior to installation it is important to assess the likely level and degree of movement after installation. The overall amount and rate of movement in individual boards will depend on the species and cutting pattern. Small variations between boards and the variable conditions within the house will also affect the amount and rate of movement. It can be assumed that during drier months small gaps will occur at the edges of most boards and that the size of these gaps will vary across a floor. A degree of movement usually occurs immediately after flooring is laid as it adjusts to its new climate. While floor finishes may influence the rate of moisture content changes, they will not prevent movement entirely. In instances where greater movement is expected, care should be taken to ensure the finish does not act as an adhesive and bonds boards together. With subsequent shrinkage wide gaps between groups of boards may occur or boards may split.
Criteria Level: 5.03
To minimise the movement of timber flooring it is important to lay and fix timber floors close to the average moisture content of timber in the environment where it is to be laid. Timber flooring is usually supplied at an average moisture content of between 10% and 12.5% and most boards can be expected to be within a few percentages of the average. Along coastal areas with higher humidity, moisture content of flooring varies from 9% to 14%. Where conditions are drier, averages range from 7% to 12%.
The installation process needs to account for the difference between average moisture content on delivery and the average in-service moisture content within the dwelling. This is typically achieved by providing additional intermediate expansion joints or acclimatising the flooring.
Effective acclimatising relies on each board being exposed to the in-service atmosphere, so boards must stacked in a way that allows airflow between each board. The effectiveness of acclimatising is also influenced by the species. For some high-density species that are slow to absorb and lose moisture, acclimatising may have little effect. A simple guide to pre-installation considerations is provided below.

Criteria Level: 1
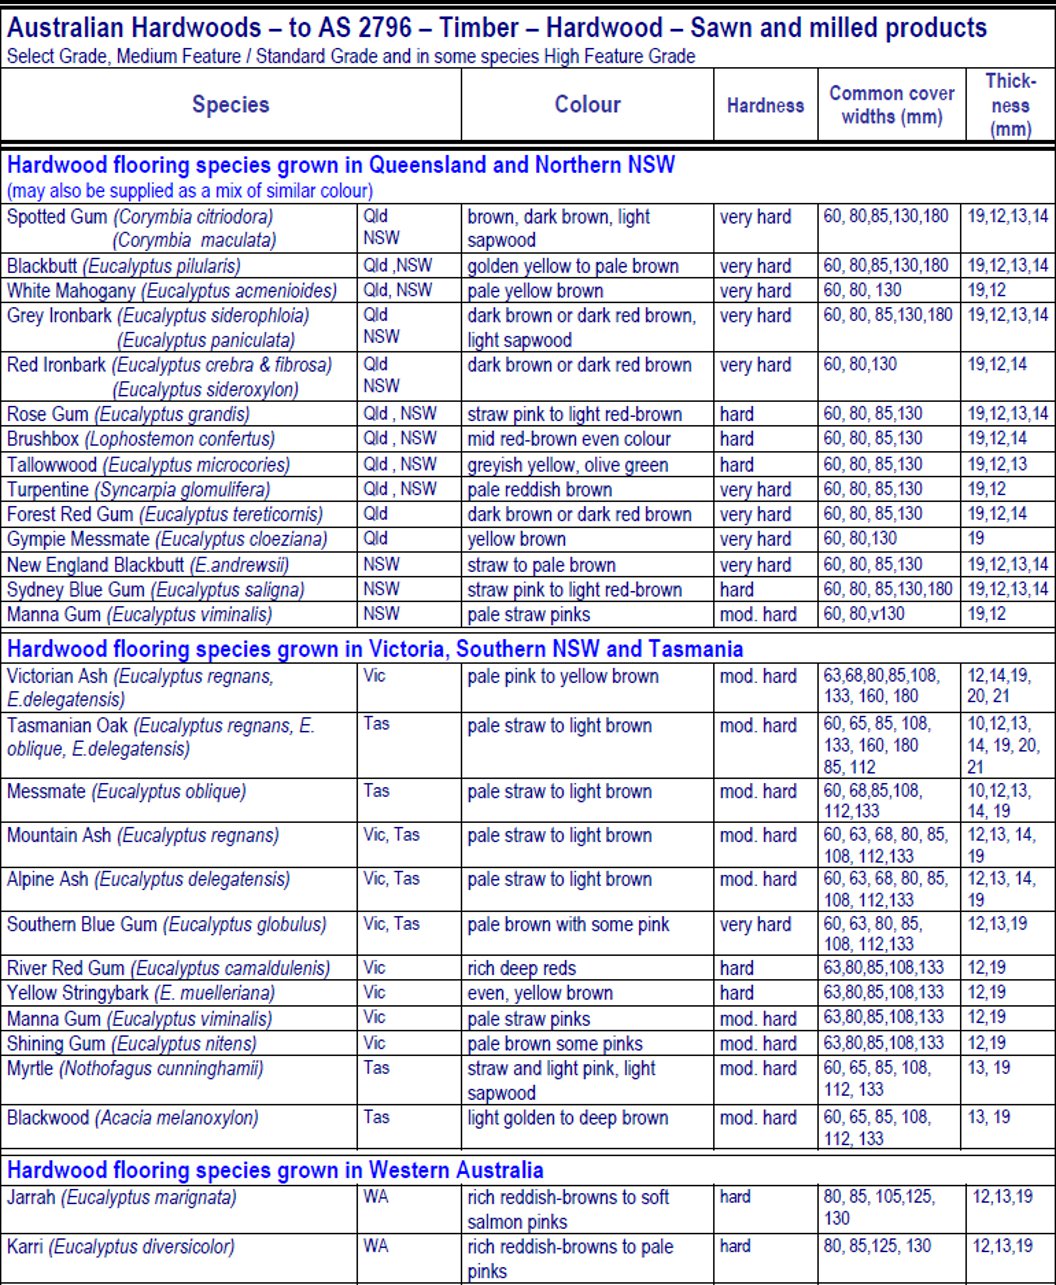
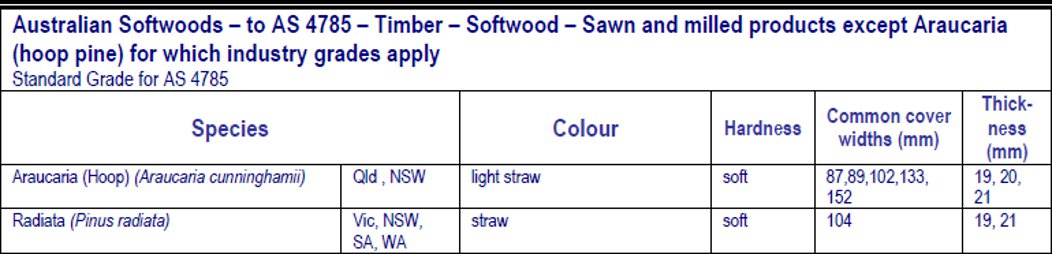
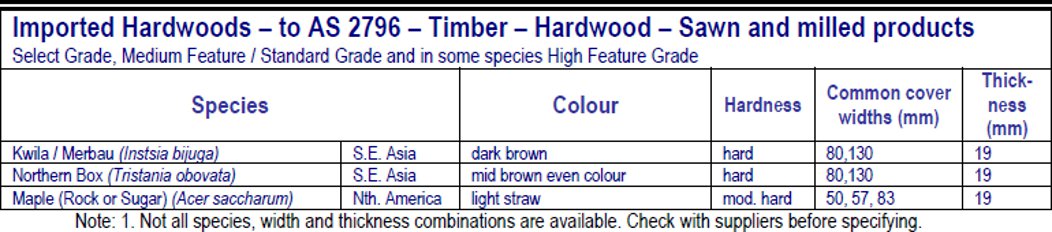
Strip timber flooring is available in a wide range of species and colours, harder and softer timbers and a variety of profiles and cover widths. The species or species mix chosen will be the main factor in determining the colour and look of the flooring.
As a guide the species table below indicates the range of colours that may be expected from commonly used flooring species. The sapwood of many hardwoods can be much lighter than adjacent heartwood and some boards may contain both light and dark colours. Note that even within a single species from an individual tree, colour variations can and do occur. Age of the timber can also influence colour, with younger timbers producing a lighter colour, and older timbers a much darker.
Lyctid susceptible sapwood of some hardwood species (e.g. spotted gum) is required by some states to be preservative treated. Some treatments will impact a brown tinge to sapwood. Light Organic Solvent Preservative (LOSP) treatment is also used. In this instance a H3 treatment may be used in lieu of H2 treatment to avoid the coloured dyes often used with H2 LOSP treatments.
The character of the floor is also influenced by the grade and grades contained in relevant Australian Standards are listed below. Note, however that manufacturers often use their own grades. Often flooring that contains more features is more moderately priced, however irrespective of features present there is no difference between the grades in terms of machining tolerances, permitted machining imperfections and moisture content.
Grading rules for solid timber flooring are contained within the following Australian Standards:
AS 2796 - Timber - Hardwood - Sawn and milled products
AS 1810 - Timber - Seasoned Cypress pine - Milled products
AS 4785 - Timber Softwood - Sawn and milled products
The selection of a hard timber species improves resistance to indentation and abrasion. Soft timber species, if used in flooring can be expected to indent. In some species the hardness of the timber will correspond with its age. Floor finishes will not significantly alter the hardness of timber flooring.
Click on the following table for a guide to the colour range that can typically be expected from common species.

Criteria Level: 1.01
Typical cover widths and thicknesses for tongue and groove strip flooring are as shown in the tables above. Actual cover widths may vary from those shown and should be checked with individual suppliers. Typical profiles are shown in the figure below. Some profiles are produced with grooves or rebates on the underside. Where the underside of a floor forms a ceiling, the board edges may be arrised to form a ‘v' joint profile. Both profiles are used for top (face) nailing and secret fixing. The standard profile is more commonly found on wider boards and some manufacturers recommend that such boards should be top (face) nailed. Some wider board flooring has the secret nail profile that allows temporary secret fixing prior to top (face) nailing.
The following are example profiles.

If the species or species mix contains a significant variation in colour the appearance of the floor will differ depending on the cover width. Narrower boards tend to blend the colour variations together better. Gapping between individual boards during drier times is also less with narrower boards. A board width of 100 mm or less will limit potential gap size and other movement effects such as cupping.
End-matching is a process where a tongue and groove joint is provided at the ends of boards. Nowadays the majority of flooring is end-matched. For floors laid direct to joists or battens this allows joints to be placed between the joist or batten, resulting in less wastage than plain end flooring, which must have its ends fixed over the joist or batten.
Criteria Level: 1.02
Flooring is generally supplied in random length packs up to 4.8m in lengths. The average length is usually between 1.8m and 2.1m. The minimum length for timber being fixed to joists is 900 mm, based on a 450 mm joist spacing. In some instances, if it is known that the floor will be laid over a structural sub-floor, then lengths shorter that 900 mm may be provided.
Criteria Level: 1.03
When ordering timber flooring, the following details should be provided to the timber supplier:
• species (or species mix)
• grade
• profile and end-joint type
• cover width
• thickness
• quantity (in linear metres)
To calculate the linear metres of flooring required, the following method is recommended.
Total length of flooring required = Area of floor (m2) x 1000 + Wastage
Cover width (mm)
Allowance for waste should be approximately 5% for end-matched flooring and 10% for plain end butt joined flooring.