
All exterior stairs serve a functional purpose, but the choice of timber in the application will turn a functional building element into an aesthetically pleasing feature. And while the construction of stairs is demanding, the investment of time will be returned, with a well constructed timber staircase typically lasting decades.
Exterior stairs are usually built from treated softwood and durable hardwoods and typically finished with paint. The construction procedure described here applies to most general type stairs of either conventional or contemporary construction.
When it comes to stairs there is a multitude of variations available for application depending on the structural requirements of the building. This guide discusses the most commonly specified stair types.
Criteria Level: 1
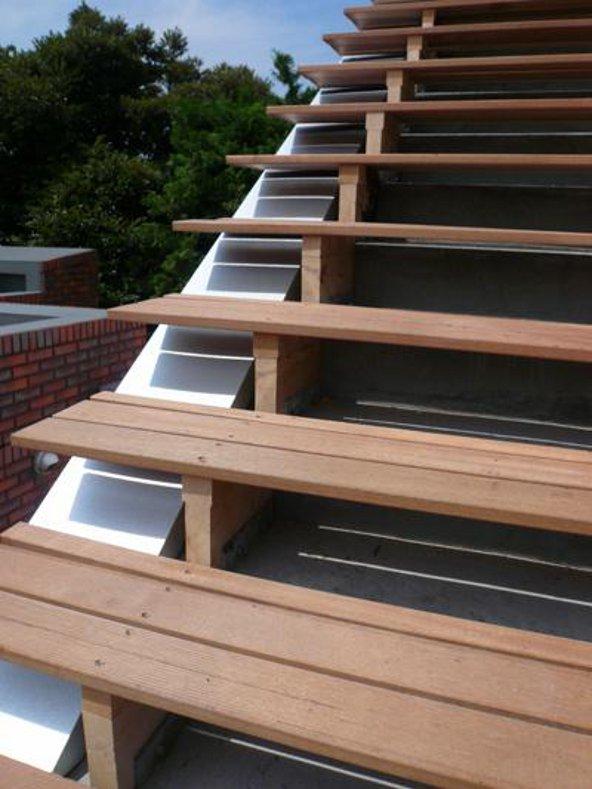
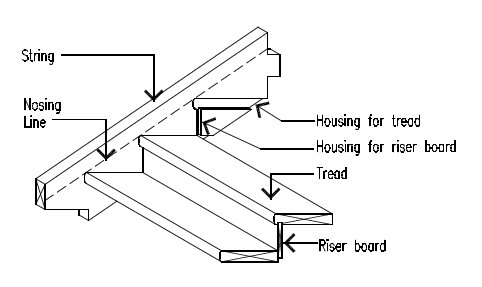
The most common type of stair construction is house treads into stringers. Flights may be constructed with ‘open treads' without risers or ‘closed treads' with riser boards. Open tread stairs are recommended for external use because they give better air circulations allowing exposed timber to dry more quickly, thus improving durability.
Metal angle brackets may be used as an alternative to housing in the treads and metal may be used for stringers. Metal strings are available in some states with a ‘stock' rise and going or can be ordered with a specific rise and going. Depending on the application, flights can be configured in various ways. The following examples illustrate the most common of these.
Criteria Level: 1.01
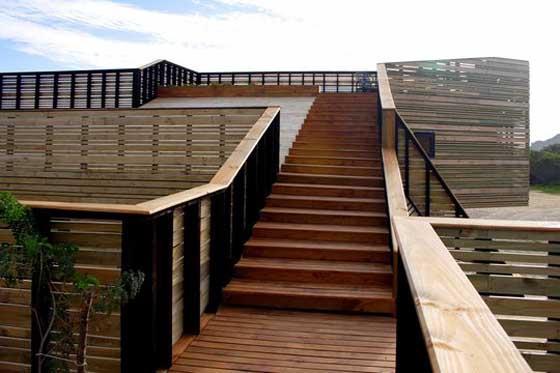
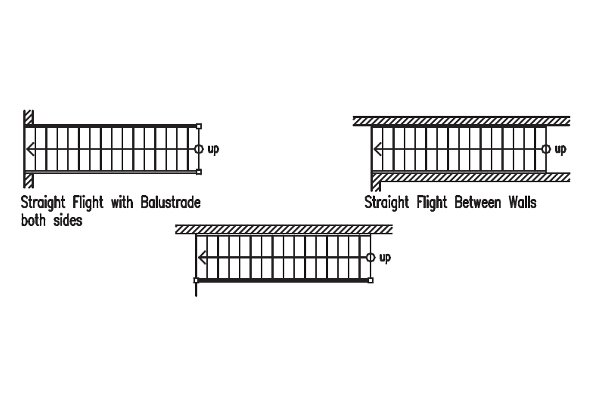
Straight stairs comprise a single flight of stairs with parallel treads. This form of stair, widely used for domestic construction, has no landing and may be enclosed between two walls or built against one wall and the other side open with newels and balustrade.
The image below is an illustrated example.
Criteria Level: 1.02
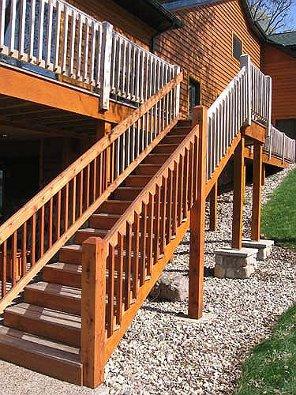
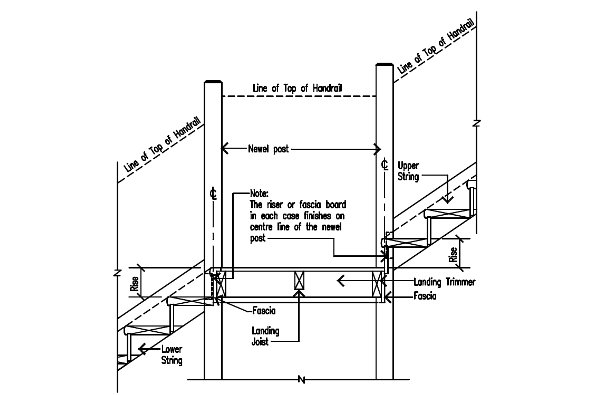
Newel stairs are all stairs that include newel posts in their construction. The newels support the handrails and/or balustrade and may also support the landings and strings. See the image below.
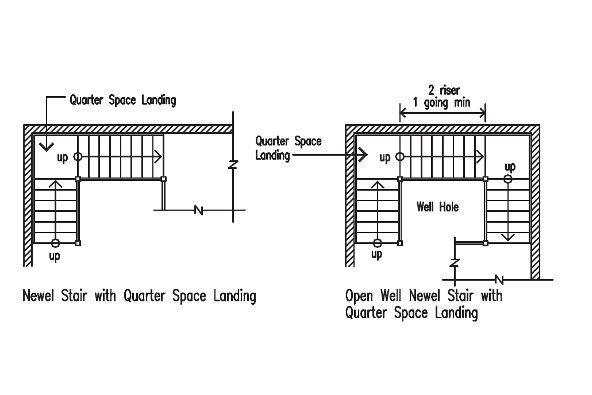
An open newel stair is also referred to as an ‘open well stair' or an ‘open well newell stair'. This form of stair has two or more flights that return on each other forming a vertical space called the well.
Criteria Level: 1.03
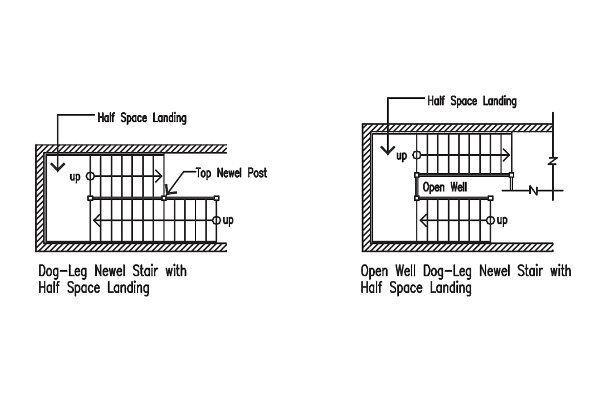
Dog leg stairs are a newel stair having two flights built at 180 degrees to each other from a half-space landing. The outer string of the upper flight is tenoned plumbed above the outer string of the lower flight and both to a single common newel. This type of stair is not commonly used in housing.
The image below is an example.
Criteria Level: 1.04
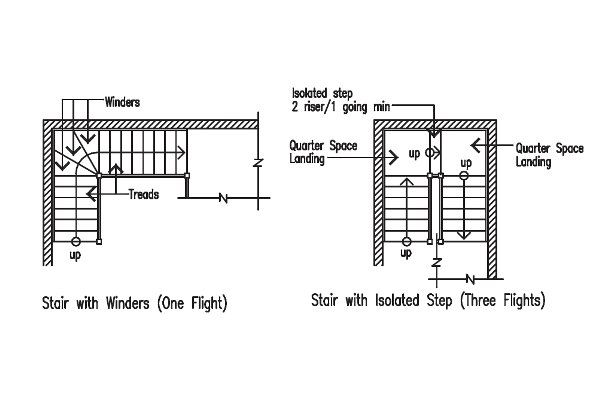
Winders are triangular shaped treads used to gain height, in place of a quarter-space landing, in a 90° turn stair. A maximum of three winders are fitted per 90°, with the centre winder referred to as a ‘kite' winder.
The image below is an example.
Criteria Level: 1.05
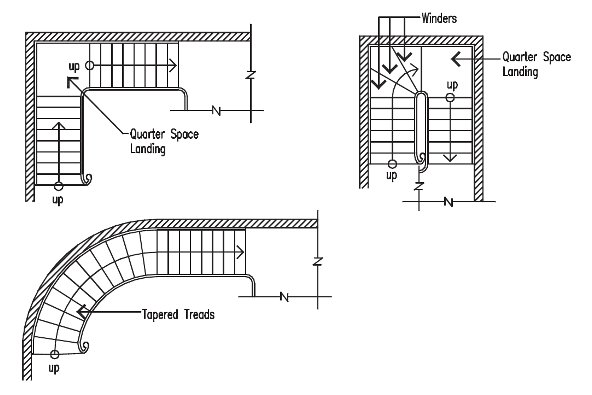
Geometrical stairs change direction in plan without using newels. The strings and handrails are continuous from floor to floor, with the curved portions being cut from solid timber, staved or laminated.
The image below is an example.
Criteria Level: 2
Exterior stairs are commonly built from treated softwood and durable hardwoods. The degree of weather exposure and the location's climate are key factors in selecting the best timber species for the application.
Criteria Level: 2.01
In warm, humid and tropical northern climates timber used in external stair construction should be either Above Ground Durability Class 1 species (with any sapwood present treated to H3 or higher) or, H3 (or higher) treated softwood such as slash, hoop or radiata pine. Preservative treatment needs to comply with AS 1604.
In temperate, cooler southern climates it should be either Above Ground Durability Class 2 or better species with any sapwood present treated to H3 (or higher) or, H3 (or higher) treated softwood such as slash, hoop or radiata pine. Again, preservative treatment needs to comply with AS 1604.
Lower durability species can also be utilised although careful detailing of joints with application and maintenance of protective coatings and/or installation of a protective shielding on top of exposed timber edges will be required.
Care should be taken to ensure that water is not trapped by end grain abutting horizontal surfaces.
Criteria Level: 2.02
As the timber components of an external staircase are structural members, they are required to be stress graded and should be free from any major strength-reducing features. In addition timber for stair and construction should also be straight grained and free from any imperfections that may detract from durability or serviceability performance requirements. Stringers, treads and posts should be in accordance with the following:
Hardwood: AS 2082 Timber - Hardwood - Visually stress graded for structural purposes - Structural Grade 1, Minimum F17 seasoned, appearance grade;
Softwood (Caribbean radiata, slash and imported softwood): AS 2858 Softwood visually stress graded for structural purposes, Structural Grade 1, Minimum F11 seasoned, appearance grade;
Hoop pine: AS 2858 Softwood visually stress graded for structural purposes - F7 seasoned, appearance grade;
Cypress pine: AS 2858 softwood, visually stress graded for structural purposes - F7 seasoned, appearance grade.
Note: In addition, finger jointed timber should comply with AS 5068 Finger joints in structural products and laminated timber shall comply with AS 1328 Glued laminated structural timber.
Criteria Level: 1
Traditionally, timber used for external stair construction is unseasoned. Specific locations and species will determine the amount of shrinkage that occurs within the timber. Generally about 6% shrinkage (6mm per 100mm) should be expected for unseasoned open forest hardwoods. As part of the design process, allowance should be made for shrinkage in unseasoned stringers, treads and any associated newel posts, landing bearers and joists, as well as the gaps that will develop between joints.
External stair timbers exposed to the weather will usually reach Equilibrium Moisture Content (EMC) with their surroundings after a period of 9 - 18 months. For coastal Australia, stairs that are well ventilated should reach an EMC of approximately 16%, for stairs close to or above water a little higher (18-21%) and for dry inland areas considerably lower (10-12%).
If seasoned timber is used for external stairs in coastal areas, consideration must be given to the expansion of the timber as the EMC rises from 12% up to about 16%, particularly at joints, and may cause splitting.
Criteria Level: 2
Prior to fabrication, one coat of a water repellent preservative or an oil-based primer is recommended for joints and housings.
Criteria Level: 2.01
For most exposed environments, hot dipped galvanised fasteners will provide the necessary protection from corrosion. The service life of hot dipped galvanised coatings will be proportional to their galvanising thickness, with a minimum of 42 microns recommended for a service life of 30 years.
The table below provides further guidance for selecting corrosive resistant fasteners in other less common environments.
APPLICATION/ENVIRONMENT | FASTENER MATERIAL | REMARKS |
Chemical, industrial and marine (surf beach or large bays) | Grade 316 stainless steel | Grade 304 stainless may require additional protective coatings such as epoxy paints |
Splash zone close to pools | Monel metal, silicon bronze and brass. Self drilling screws to be Class 4 finish | Monel nails and screws available, usually used for boat building, are a good option close to pools. Silica bronze nails are good for acidic species such as western red cedar. |
Mild marine, industrial and other | Hot dipped galvanised or mechanically plated, minimum thickness 42 microns. Self-drilling screws to Class 3 finish. | Where hot dipped galvanised bolts etc are in contact with moist CCA/ACQ etc treated timber, additional protection using plastic sheaths, bituminous or epoxy paints is required. |
Criteria Level: 3
The sizes and spans for stringers and treads for external stairs should be in accordance with the following.
Stair Stringers (Maximum Stair Width 1800 mm)
TIMBER TYPE | STRINGER - [Depth (mm) X Thickness (mm)] (1) | |||||
Species/ Group | Grade(2) | 200x38 | 200x50 | 250x38 | 250x50 | 300x50 |
Maximum Stringer Span (mm) (3) | ||||||
Messmate, spotted gum, blackbutt, kwila etc | F27 | 2900 | 3200 | 3600 | 3900 | 4500 |
Vic ash, Tas oak, jarrah | F22 | 2800 | 3100 | 3400 | 3700 | 4300 |
Spotted gum, blackbutt, ironbark, kwila etc | F17 | 2600 | 3000 | 3300 | 3600 | 4200 |
Douglas fir (nth American) | F11 | 2400 | 2700 | 3000 | 3400 | 3900 |
Radiata, hoop, slash etc | F8 | 2300 | 2600 | 2900 | 3200 | 3700 |
H3 treated pine | F5 | 1600 | 2200 | 2400 | 2800 | 3400 |
NOTES
1. The size of stringers given in the table are nominal sizes. Design allowances have been made for dressing (depth 10 mm max, thickness 5 mm max). Allowance has also been made for trenching stringers to accommodate treads (10 mm max).
2. Timber grading should be in accordance with the appropriate Australian Standard for milled products (ie AS 2792 and AS 4785). The stress grades used for design in accordance with the loading requirements of the BCA are as indicated.
3. Stringer span is the centre line length of the stringer.
Stair Treads (with open flights)
TIMBER TYPE | STAIR WIDTH [TREAD SPAN] (mm) | |||||
Species/ Group | Grade(2) | 750 | 1000 | 1200 | 1500 | 1800 |
Minimum thickness of tread (mm) (1) | ||||||
Messmate, spotted gum, blackbutt, kwila etc | F27 | 26 | 32 | 38 | 48 | 58 |
Vic ash, Tas oak, jarrah | F22 | 28 | 34 | 40 | 50 | 60 |
Spotted gum, blackbutt, ironbark, kwila etc | F17 | 28 | 36 | 42 | 53 | 65 |
Douglas fir (nth American) | F11 | 31 | 40 | 46 | 58 | 70 |
Radiata, hoop, slash etc | F8 | 32 | 42 | 50 | 62 | 73 |
H3 treated pine | F5 | 40 | 46 | 54 | 70 | N/A |
NOTES:
1. The thicknesses in the table are minimum design thicknesses and may not represent commercially available thicknesses.
2. Timber grading should be in accordance with the appropriate Australian Standard for milled products (ie AS 2792 and AS 4785). The stress grades used for design in accordance with the loading requirements of the BCA are as indicated.
Criteria Level: 4
Design issues are driven by regulatory requirements in the Building Code of Australia. Safety of users is the primary concern of the BCA so design and construction must therefore take into consideration both the strength and durability of materials and components as well as geometric constraints prescribed by the BCA.
The following provides a brief summary, for full details refer to the BCA.
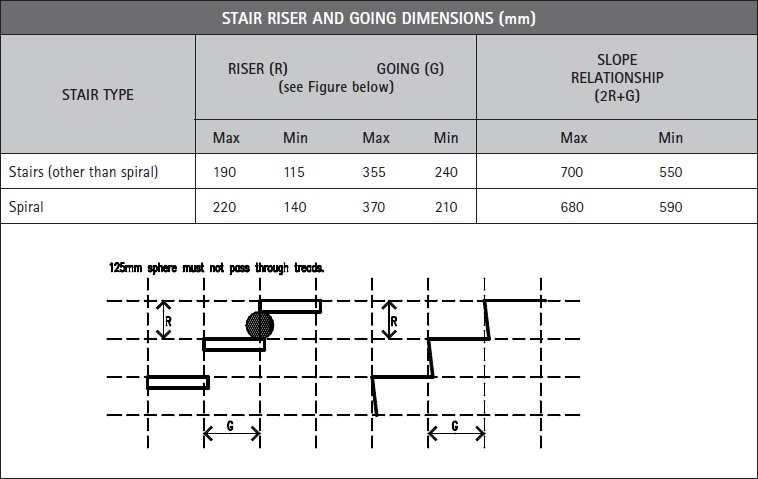
- Each flight must not have more than 18 risers nor less than 2.
- The nominal dimension of goings and risers of a stair must be constant throughout each stair flight.
- The riser opening must not allow a 125 mm sphere or more to pass between the treads.
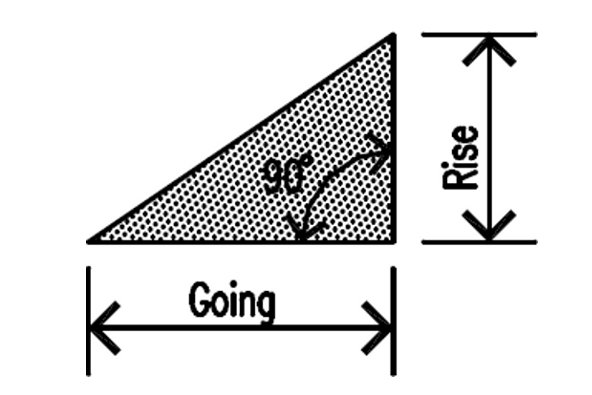
- The going (G), riser (R) and slop relationship quantity (2R+G) must be in accordance with the table below.
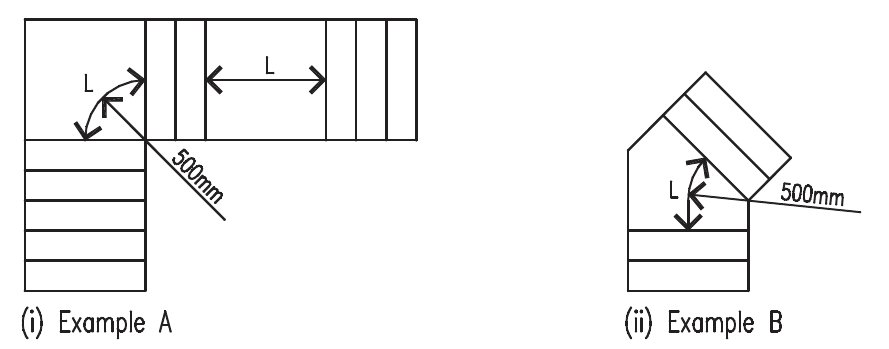
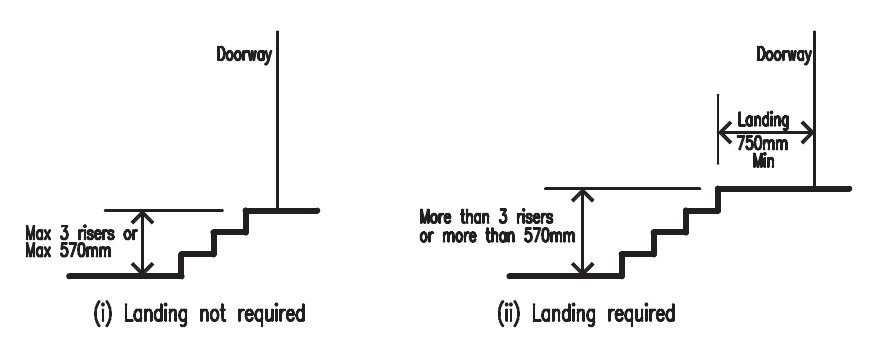
- As per the illustration below, landings must be not less than 750mm long and where this involves a change in direction, the length is measured 500mm from the inside edge of the landing.
- Landings must be provided where the sill of a threshold of a doorway opens on to a stair that provides a change in floor level or floor to ground level greater than 3 risers or 570mm. Click on the image below for an illustrated example.
- Stair treads must have a slip resistant finish or an anti-skid strip near the nose of the thread.
Criteria Level: 1
Other than for aesthetic reasons, the main objective of applying and maintaining finishes on timber used in external application is to minimise the effects of weathering and thus maximise the service life of the timber. Weather exposure leads to wetting and drying and subsequent checking, splitting and distortion.
Criteria Level: 1.01
Nail holes should be stopped with an exterior grade wood filler and dirt or any loose material removed prior to coating. All surfaces, ends and joints should be primed prior to assembly with a quality solvent based alkyd primer or stain, in accordance with manufacturer's recommendations. Final top coats of exterior paint or stain should then be applied in accordance with manufacturer's recommendations.
Criteria Level: 1.02
Nail holes should be stopped with an exterior grade wood filler. All surfaces, ends and joints should be primed prior to assembly with a quality, solvent based alkyd primer. When the primer has dried, apply two full coats of premium 100% acrylic exterior topcoat. Dark coloured paints and stains should be avoided as they heat timber to elevated temperatures, causing greater loss of moisture and subsequent shrinkage and checking. Decay is also more active at higher temperatures. All finishes should be applied and used in accordance with the manufacturers recommendations.
Criteria Level: 2
Frequent wetting of the staircase should be avoided and cleaning should be limited to sweeping rather than hosing down. Adequate ventilation will facilitate more rapid drying after rain.
Reapplication of finishes will be required at regular intervals, depending on finish type and degree of exposure. Before recoating all stairs should be thoroughly cleaned and debris removed from around steps. Recoating should be carried out in accordance with the manufacturer's recommendations.
Criteria Level: 1
The construction of stairs requires high levels of workmanship, detail and accuracy. Open tread stairs are recommended for external use since housed risers will trap moisture and prevent good drainage and drying out. As per BCA requirements the rise and going must be uniform throughout the flight, however for external stairs the bottom may vary slightly.
A straightforward external stair construction procedure is described below.
Criteria Level: 1.01
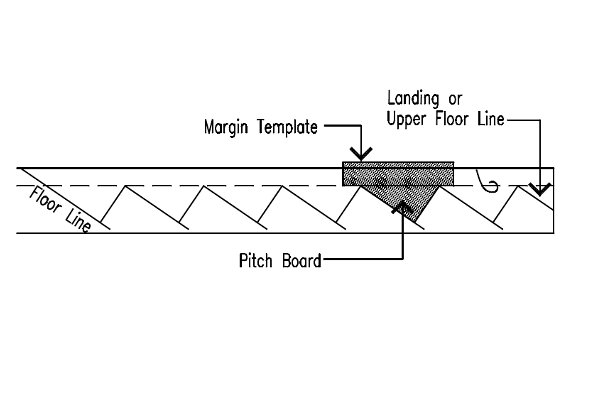
Using a piece of plywood, masonite or similar, mark out and cut a pitch board using the going and rise calculated. The image below is an example.
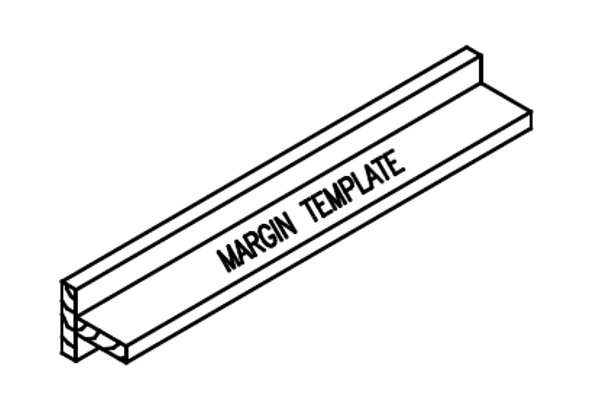
Margin template:
To create a margin template, firstly calculate the width of the margin (X) by following these steps:
1. Place the pitch board on the string, with the hypotenuse of the pitch board flush with the string edge.
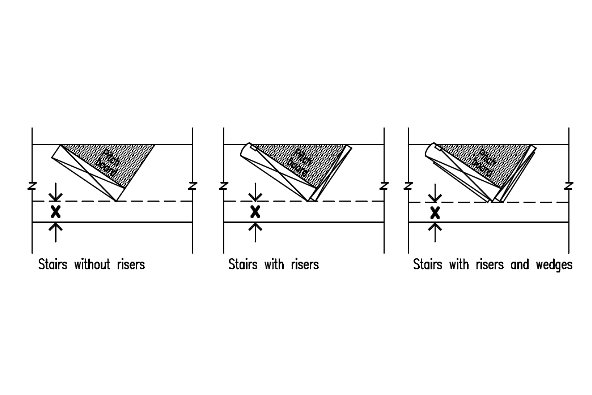
2. Use off-cut pieces of tread and riser board to draw into this trial position, the tread, and also riser and wedges if used. For stairs with riser boards, place the off-cut piece of tread upside down and align the front edge of the riser housing with the edge of the string as shown in the figure below.
3. Draw a line just below the tread (or wedges if used) and parallel to the string edge.
4. The distance X is the width required for the margin template.
A suitable margin template can now be constructed using off-cuts from mouldings.
Criteria Level: 1.02
When marking out stair strings, good practice is to mark out the same hand string first every time. This practice should develop a clearer recognition of the correct positioning of members.
The string handling is determined by looking up the flight, the two strings in one flight are a pair, one left and one right-handed string. Place strings in pairs on saw tools and mark inside face and top edges - consider the effect of any spring or bow. For short flights with one step bolt, place the hollow of the bow in and for longer flights with two step bolts place the hollow of the bow out. String edges should be rounds up (spring up).
Having paired the strings by face and edge marking them, commence marking out the left-hand string. Draw the margin line with the margin template, then using the pitch board, start at the bottom of the flight and mark the position of the floor, the first rise and going.
Before continuing to mark the string, a pair of wind dividers set to distance X in the figure below should be used to mark along the margin line the number of remaining steps in the flight. This action will serve to equalise successive marking with the pitch board and avoid possible loss or gain.
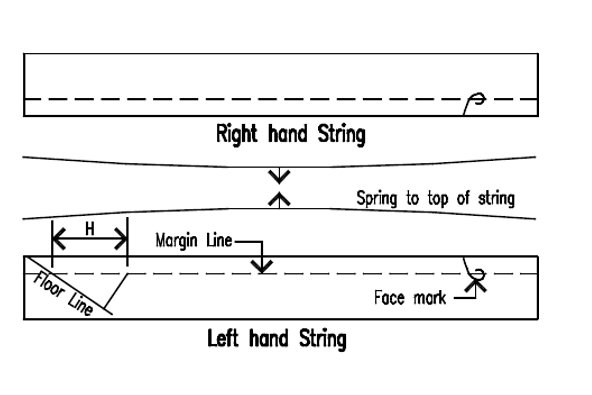
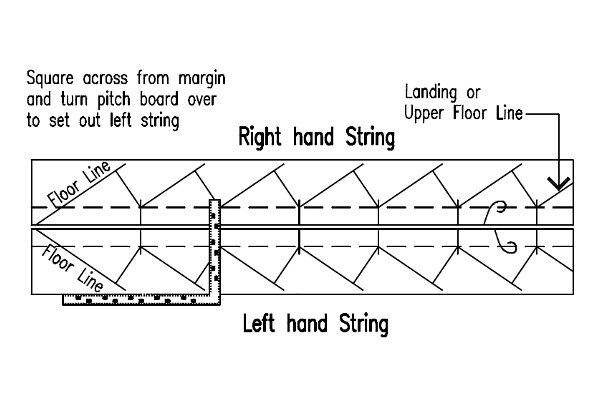
After completing the marking of the first string, place both strings together as a pair and square the points on the margin line across from one to the other. This method will prevent length differences between the two strings. The image below is an example.
When satisfied that the initial marking, proceed to complete the marking for the housings. Number each tread and riser. Select treads and risers (if used) in numerical order and scribe thickness and shape onto strings.
Using a gauge, mark the housing depth (15mm) onto the back edge of the string. Always gauge from the outside of the tread. This will account for any differences in thickness of the tread particularly when using unseasoned rough sawn timber.

Criteria Level: 1.03
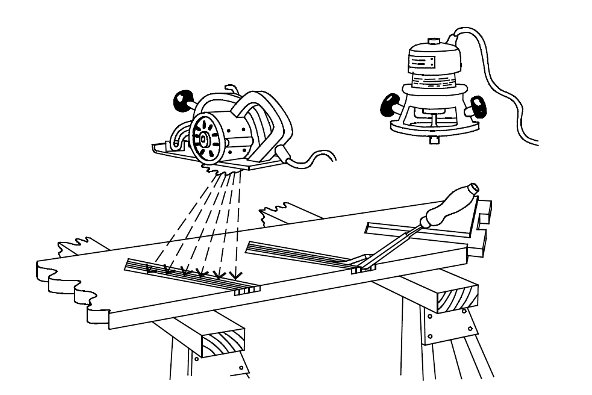
The most simple and suitable method to house strings for external stairs using rough sawn timber is to use a power saw to cut along the lines marked for the treads. Set the depth of the saw to the housing depth, 15mm. Run the saw a number of times between these cuts and then use a mallet/hammer and chisel to remove the remaining material.
A router with a template guide fitted can be used and is possibly the best and neatest method for housing strings on site.
Check that each numbered tread fits tightly into its corresponding housing.
The image below is an illustrated example.
|
|
Criteria Level: 1.04
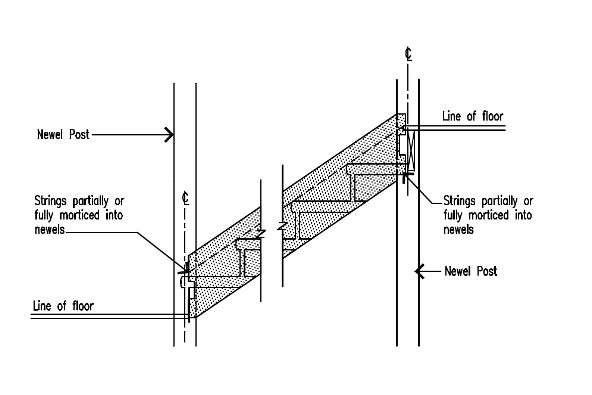
The marking for the appropriate joints at the ends of the strings can now also be completed. For a simple external flight the string is generally notched over the bearer (or landing plate) or tenoned into a newel post at the top and birdsmouthed over the bottom tread. When newel posts are used, tenons are cut on the end of the strings and the newels morticed to suit.
|
|
|
Cut treads and risers to length and number from bottom to top - make allowance for extra length on bottom tread if specified - remove arrises (edges) as required. If risers are being used and the treads are not pre-grooved, groove the treads for risers.
Criteria Level: 1.05
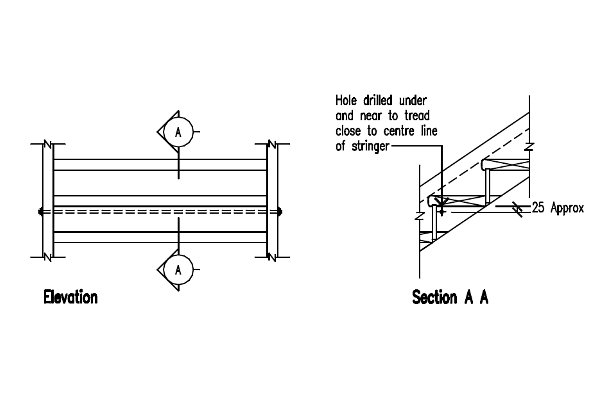
Except in cases where the stairs fit between two walls, step bolts will be needed. Bore the stringers to take 12mm step bolts at a maximum of 1350mm centres. Position them to coincide as closely as possible to the centre line of the string and underside of a tread, leaving a gap between the underside of the tread and the bolt.
The image below is an illustrated example.
Criteria Level: 2
Before commencing assembly, prime paint or oil all joints and surfaces that will be concealed, enclosed or unable to be painted after assembly including the newels, bearer or joist where the stairs are to be fixed.
A simple method of finding the position of the stumps, under the bottom tread, is to take one of the cut strings, place it in position and then level the tread housings with a spirit level. Make any adjustments necessary by packing under the lower end of the string. Use pilot pegs to locate the centre and top of the stumps as shown in the figure below.
Fit top and bottom treads - for flights with risers, the bottom riser only to strings - and nail together. Nail together with three 100 x 4.5 mm nails per joint. Pre-drill if necessary. All nails used should be hot dipped galvanised. Fit and loosely tighten step bolts if required. Lift this partly assembled job into position fit the stringers to the newels, bearers or joists as required. Fit the remainder of the treads and risers where used and nail with three nails per housing. Tighten the step bolts.
It is good practice when using unseasoned timber to nail treads and risers temporarily only allowing as much time as possible for shrinkage to take place, after which, nails are withdrawn, joints closed then nailing and punching completed.