

The inherent appeal and strength of timber makes it the obvious choice for fencing. Timber fencing not only provides a natural look in keeping with the outdoor environment but it also enables the construction of a long lasting, durable property boundary. Fences come in many forms including the traditional paling, picket, post and railing styles. Most rely on a structural frame of posts embedded into the ground and two or more rails spanning between the posts. The ultimate selection of a suitable fence type or style is determined by application and aesthetics. A fence can serve a variety of purposes, including the provision of security, privacy and safety in addition to defining property boundaries. Specification for durability is important, especially for posts, given their exposure to high moisture in the ground.
This section provides an overview to best practice methods in specifying, installing and finishing a timber fence.
Criteria Level: 1
Careful selection of a species most suited to the particular fencing application will ensure the longest service life possible. The service life of a timber fence can be enhanced with the application of appropriate finishes, timber treatments and regular maintenance.
Criteria Level: 1.01
Timber species are rated into four classes of durability for in ground contact use and four classes of durability for outside above ground use, with Class 1 being the most durable and Class 4 the least durable.
Fencing is mostly above the ground with the posts, as well as plinth boards, being the only portion of the fence that need to be specified for in ground contact use. The remainder of the fence, not having ground contact, can be based on above ground service life.
Ideally, fencing timber should be chosen from durability classes 1 or 2 where its natural durability would provide an expected service life in ground contact of at least 15 years and if outside above ground and properly maintained, many years beyond this.
Criteria Level: 1.02
Fence construction often uses preservative treated timber. As with naturally durable species, decay is typically concentrated below ground where the timber will remain wet and exposed to both fungal and termite attack.
Timber treated fence posts should therefore be specified to a H4 level, with a H3 level of treatment sufficient for rails and palings. Before installation, ensure any cut or joint to treated timber has an appropriate preservative applied.
Criteria Level: 1.03
Timber is generally graded for either structural and/or visual properties however there are currently no specific grading rules for fence palings to limit materials, although an implied ‘suitable for purpose' requirement exists in most cases.
Criteria Level: 1.04
Sizes used for posts and rails are not based on a set of engineered span tables.
Post sizes are generally 125 x 50 for hardwood and 125 x 75 for treated softwood. They are generally 1500, 1800, 2100 or 2400mm high or to suit the design requirements. Typically posts are placed at 2.4 or 2.7m centres, which may vary slightly to fit in with the fence length.
The number of rails is generally dependent on the height of the fence and common practices within the state. Generally two rails are required for fences below 1800mm high and three rails for those fences 1800mm or greater. Typical rail sizes are 75 x 50mm for unseasoned hardwood and 70 x 45 for treated softwood. Lengths are generally no more than 2.7 metres.
Criteria Level: 2
There are a multitude of styles and designs of timber fences. The chosen style will ultimately depend on its intended application. This article covers the most commonly specified fence types.
Criteria Level: 2.01
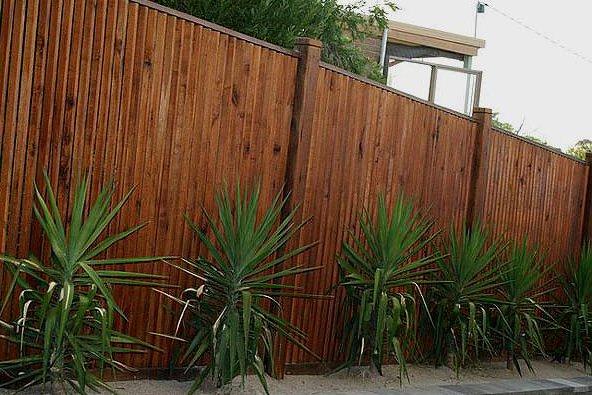
Providing boundary separation and protection, paling fences typically range in height from 1200 mm to 2100 mm. Generally a post and rail frame is constructed with the palings being nailed onto the rail vertically, butting the palings against each other.
For improved privacy, standard palings can be replaced with tongue and grooved palings. These palings are machined in a similar manner to internal paneling but are generally thicker with a smooth surface. On completion they offer a very solid and impressive appearance.
Criteria Level: 2.03
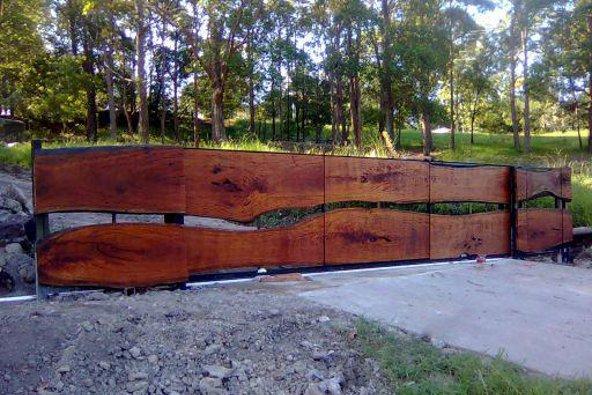
Board or corral fences are similar in style to paling fences but with more variations and thicker and wider palings (typically 150 x 25mm). The following briefly describes some common types:
Vertical board fences. Boards are installed vertically with a gap of 25mm between each board. This style blends well with the landscape but is more suited to screening rather than providing a solid barrier. The following image is an example.
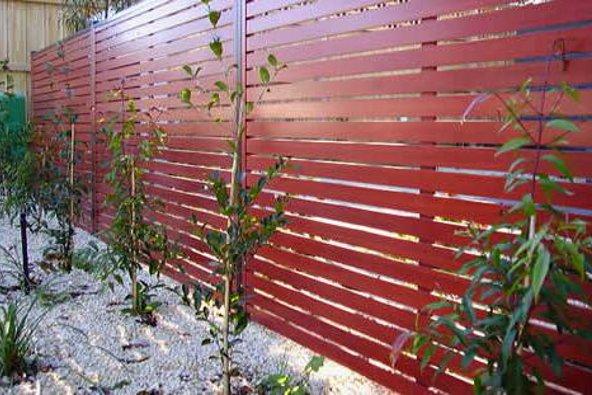
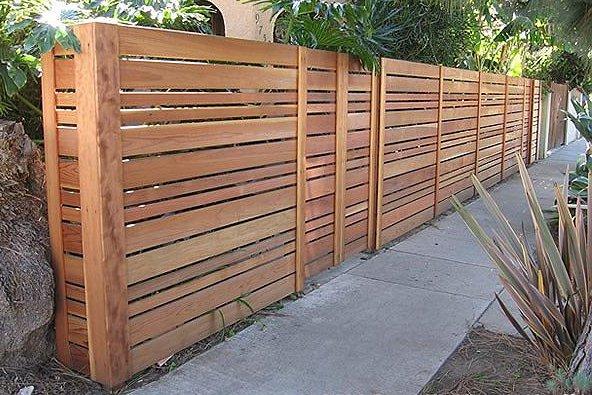
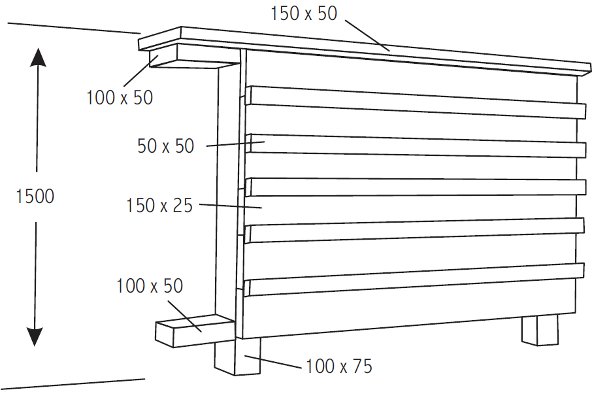
Horizontal board fences. Also known as corral fences, horizontal board fences comprise wide boards gapped 25mm apart. The boards may be run on a single side or both sides of the posts to give a stepped appearance. The following image is an example.
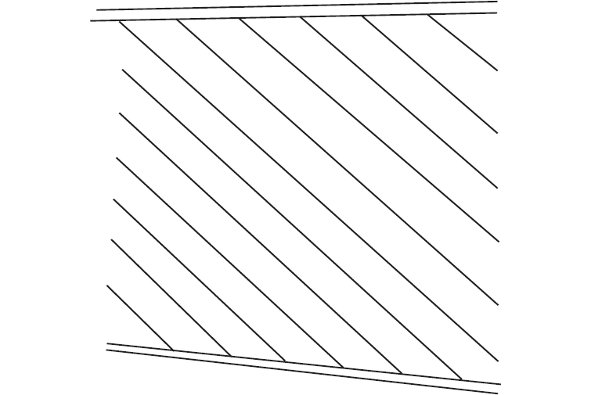
Angle and herringbone. Boards follow the general specifications of the corral fence but are set at an angle of 45 degrees to the horizontal. Alternative panels may be reversed in direction to achieve a herringbone pattern. The following image is an example.

Board and Batten. This design uses wide boards typically 150 x 13/19m butted against each other and installed vertically. A cover batten is then fixed vertically over each butt joint. This fence style offers a strong and solid appearance with good visual privacy.
Criteria Level: 2.04
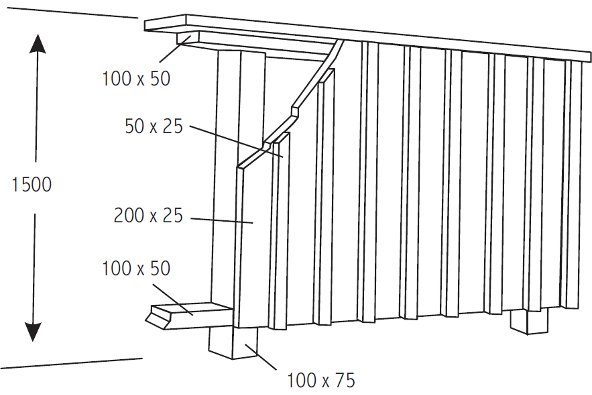
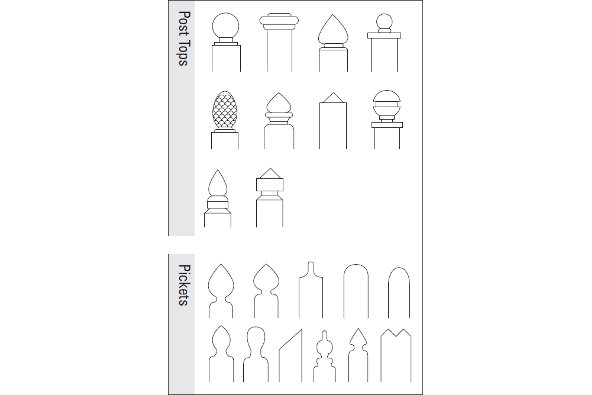
Picket fences may be square in section (slat style) or have their top, and sometimes their bottom finished in a profile. The posts within these fence types are often finished with decorative detail. The set out of the pickets or slats may be finished level, rise and fall scalloped or set square with the last few boards sloped up to the post height. The following image shows some examples.
Criteria Level: 2.05
This fence is a framework of support posts and horizontal rails with no paling or boards. As it offers only limited security and no privacy it is generally used only for defining boundaries or to fence livestock.
Criteria Level: 2.06
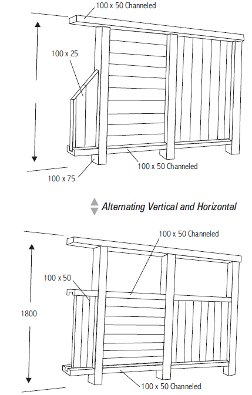
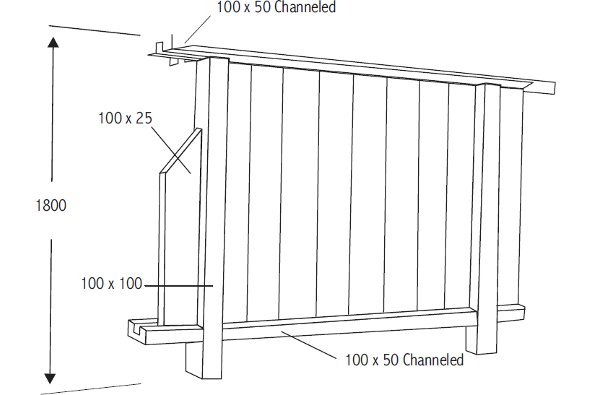
The channel fence uses palings or boards that fit between profiled timber channels. The configuration may vary considerably with palings run horizontally, vertically or in combinations of alternating panels. The following image is an example..
Criteria Level: 2.07
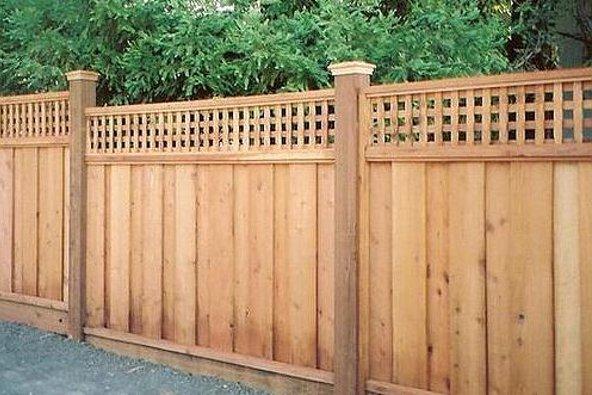
Lattice fencing utilises panels of timber lattice framed with channelled timber fixed to the main support posts. Alternatively for vertical or horizontal lattice, the lattice panels may be directly fixed to a post and rail framework.
Given the lattice fences' reliance on the stiffness of the panel for structural stability, it is typically no higher than 1.2 metres. For anything higher care should be taken to ensure the lattice is securely fixed. Closer post centres and mid rail support may assist this.
Criteria Level: 1
The moisture content of timber will always fluctuate slightly to be in equilibrium with its environmental conditions. This is particularly the case for unseasoned timber, which is often utilised in fence construction, and thus some shrinkage and minor movement of the material should be expected.
Note that some fencing construction details, typically cuts or joints, will tend to hold moisture and without adequate protection timber decay may result. These cuts may expose timber not sealed or expose untreated heartwood in preservative treated wood. The mortised or halved joint and the post base at the ground line are the two key areas for decay in timber fencing.
Coatings that reduce the take up of moisture will enhance the performance of the fence and help in reducing movement and preventing fungal attack and decay.
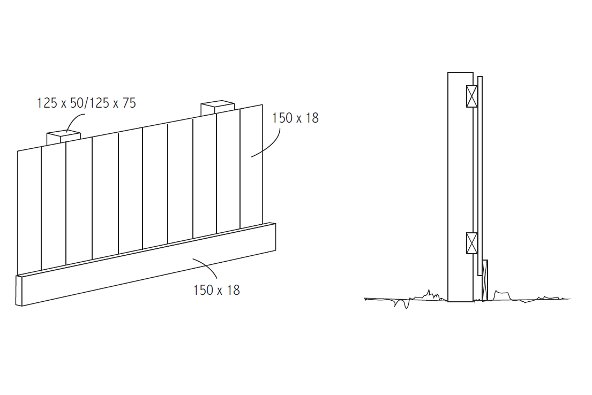
In addition, capping on the top of the fence will reduce the timber's susceptibility to moisture absorption by limiting the posts and palings moisture exposure and shielding some of the paling.
Criteria Level: 2
Before commencing installation of the fence it is imperative that the location of any potentially affected service lines are confirmed. Failure to locate these services may result in damage to the service or potential injury to the installers.
To avoid any neighbourhood disputes, the precise location of the fence should also be confirmed and accurately set out. Generally the neighbouring property is required to pay 50% of all costs. It is good practice to confirm details in writing to avoid disputes at the end of the project.
Depending on the local authority there may be design and style requirements that will need to be adhered to and pre approval may be necessary.
Criteria Level: 3
The site of the intended fence should be cleared to enable installation without impact from vegetation, garden refuse or other obstacles. At this stage it is advisable to check the soil conditions to determine any potential problems such as rock fill that will impact the installation and footing requirements.
Criteria Level: 4
The use of suitable fasteners will improve the structural performance and longevity of the fence. A minimum for all applications is hot dip galvanised fasteners. In environments where the conditions are extremely corrosive it may be necessary to utilise epoxy coated hot dip galvanised or even stainless steel fasteners.
For rails to posts use 2 x 75mm x 3.15mm bullet head in hardwood and cypress, flat head, twist shank into softwood. Alternately 10mm cup head bolts over bored to allow for shrinkage.
For palings to rails, nail lengths should be sized to allow a minimum penetration of 25mm into hardwood and 35mm into softwood. Flat head nails - twist shanks - are preferred for softwood.
To avoid termite damage AS3660 recommends that the palings be kept clear from ground contact. If a gap between the palings and the ground is unacceptable then a plinth board should be installed. The plinth board is placed on the edge into the ground and runs along the fence line, as can been seen by the illustration below.
Criteria Level: 1
The installation method for any fence will vary depending on individual specification, environmental and structural requirements. There are however, some common approaches to the installation of all fences, and the best practice methods of these are outlined below.
Criteria Level: 1.01
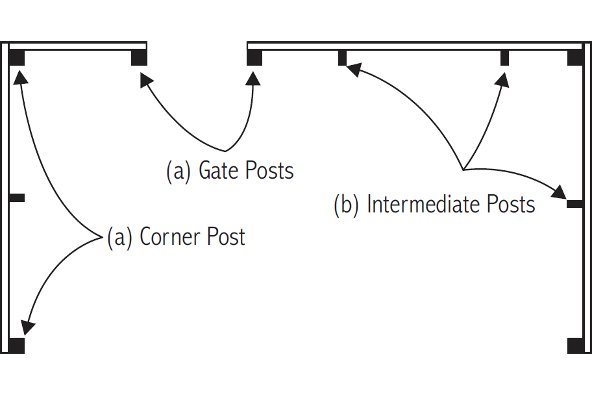
To begin a string line should be set along the fence line. The end or finishing posts, gate posts and corner posts should be located and footing holes marked. Footings are traditionally dug to allow an embedment of one third of the post height. Post tops should be set at the required finish level, usually 1500, 1800, or 2100mm high or to suit specific design requirements.
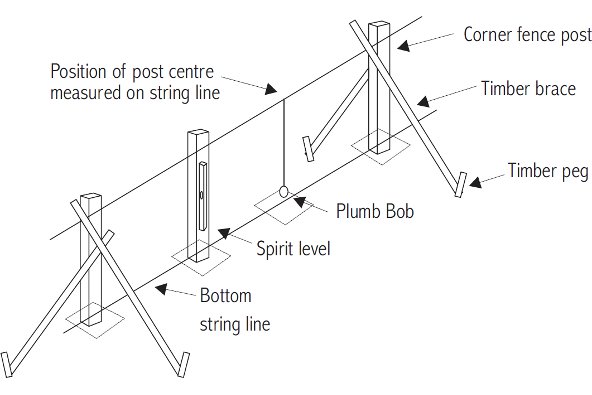
Next, excavate the footings and place the posts in position and brace them plumb. Once the posts are in position a string may then run along the fence line - post to post - attached to the face side (paling side) of the posts. This string line forms the upper height for the intermediate posts as illustrated by the figure below.
Criteria Level: 1.02
Locating the position of the intermediate posts is best achieved by dividing the distance between the key posts and the corner posts, into the desired panel length.
Panel lengths will vary with the fence length. On long fence runs a standard panel size (either 2.4 or 2.7m) is utilised with the odd panel making up the length at the most visually obscure end. In contrast, shorter fence runs generally divide the run into equal panel lengths.
Using a tape to run the length of the string line, set out intermediate post holes by setting the desired panel widths as per the previous step. A plumb bob can then be used to set the post hole and the centre of the footing. Alternatively utilise a long spirit level held vertically from the measured post position. The ground should be clearly marked at these points.
The figure below is an example.
Criteria Level: 1.03
Typically for an 1800mm fence footings are excavated to approximately 700mm in depth. This allows post embedment of 600mm sitting on 100mm of gravel. The 100mm of gravel acts as the base of the hole, allowing for better drainage away from the timber.
It should be noted that based on their location, fence posts will be subject to various levels of wind loads.
Criteria Level: 1.04
Either mortice, slot or house the post to accept the rails or alternatively utilise a proprietary system. Proprietary systems offer an advantage, as they generally do not require the cutting of posts, which not only reduces time but improves service life.

Criteria Level: 1.05
Each post should be numbered to correspond with its intended position. Once numbered, place each post into the hole and whilst maintaining its final plumbed position, mark in accordance to the string line and trim to length.
Depending upon the slope of the land, the intermediate posts may be installed in line with key posts, stepped, or a combination of these effects. The final contour line of the tops of these intermediate posts will drive the final fixing lines of the palings. Set the string line to the desired set out as per the preferred contour.
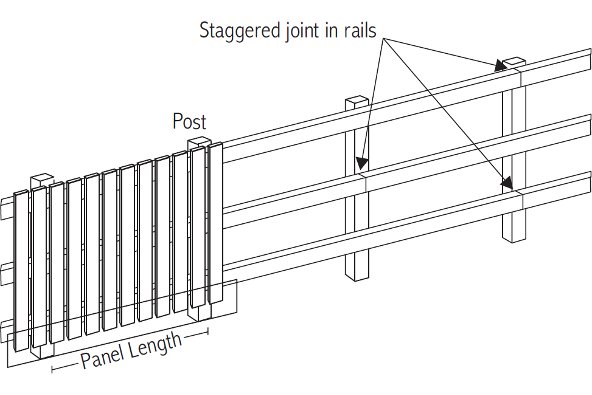
The rails can then be fixed in place and should be sufficient in length to cover the space of two panels. The first rail however will cover only one panel. It is recommended to cut one long rail to fit this section, allowing for joint fixing in the end or corner posts mortice or housing and an angled or spliced cut at the first intermediate post.
The next rail should be cut to fit this first joint at the housing or within the mortice. Cutting and fitting two panel length rails should continue to the end of the fence. Commence fixing by nailing (in morticed joints) or bolting (in housed posts) from the starting post, temporarily bracing the posts. This method produces a staggered effect to rail joints as demonstrated by the following figure.
Criteria Level: 1.06
Plumbing and alignment of the posts must be done to suit the string lines originally set. Correct practice will ensure each post has been:
- Adjusted to the string line for height by adding or removing some filling below the post - it may be possible to ram the post in more firmly lowering the height
- Aligned to its face edge with the string line
- Plumbed on its face edge by adjusting the position of the bottom of the post in the hole utilising a spirit level.
In addition each intermediate post should have a railing piece attached as required and all should have complete nailing or bolting of joints.
The backfill and concrete may now be installed. Check regularly to confirm that posts are not knocked out of plumb and that accuracy of position is maintained.
Criteria Level: 1.07
The frame is now ready for installation of the timber palings. Palings should be fixed in small batches set to a stringline height, fixed by a single nail initially. Utilise a spirit level to check for plumb and then firmly nail two nails at each rail junction. Palings are not designed for embedment and should finish clear of the ground.
Criteria Level: 1
Proper care and maintenance will ensure the natural beauty and structural stability of a timber fence endures for decades to come.
Two elements that may impact the longevity of a timber fence are dry and wet rot. Dry rot occurs when water penetrates the wood causing it to lose its protective oils, in turn making the wood dry and brittle. Wet rot occurs when moisture meets timber over a prolonged period.
To prevent either of the above arising, to minimise other elemental effects and to ensure a long lasting fence, the application of a protective finish immediately after installation is recommended.
Ongoing maintenance should include ensuring the fence is kept clean and free of any debris that may trap moisture or provide fertile ground for termite growth.
Typical finish options are outlined below.
Criteria Level: 1.01
These are generally water repellent materials (WRP) in a light organic solvent base that often include chemicals that inhibit decay. These finish types provide protection against moisture and are recommended as a priming coat for other coatings. The compatibility of WRP with other coatings should be checked. Generally two weeks is required between application of WRP and other finishes.
Clear finishes provide minimal protection against the UV effects of the sun. When used on their own they require reapplication at six month intervals.
Criteria Level: 1.02
Opaque paint finishes provide the best protection against weathering, however they obscure the natural colour and grain of timber.
Oil based primers are recommended for both oil-based and water-based paint finishes.