Interior staircase work is considered a specialised area of carpentry and joinery as its construction requires high levels of workmanship, detail and accuracy. Many interior stairs are built from quality joinery timber, cut and seasoned especially for staircases. Interior stairs differ considerably in design, from simple straight flights, commonly used in domestic work, to more elaborate stairs, constructed purposely as stand out features in public and commercial buildings.
The construction procedure described here applies to most general type stairs of either conventional or contemporary construction.
Criteria Level: 1
As a general rule all components of internal stairs should be seasoned. Seasoned timber is usually supplied at average moisture content between 11% and 13%. Where conditions are drier or in air-conditioned buildings, moisture content of timber may vary from 7% to 12%. In these situations the timber may need to be acclimatised on-site prior to fabrication.
During periods of high humidity timber will absorb moisture from the air, causing it to swell or increase in size. Conversely, during drier times, timber will shrink, reducing in size. Unless the staircase is in a permanently controlled environment, the timber will always move in response to changing environmental conditions. Gaps between treads and housings, treads and riser boards can be expected as the timber accommodates seasonal changes. Additional shrinkage can occur when a staircase is exposed to heat sources such as fireplaces or regular sunlight.
Criteria Level: 2
The sizes and spans for stringers and treads for internal stairs should be in accordance with the following tables.
Stair Stringers (Maximum Stair Width 1800 mm)
TIMBER TYPE | STRINGER - [Depth (mm) X Thickness (mm)] (1) | |||||
Species/ Group | Grade(2) | 200x38 | 200x50 | 250x38 | 250x50 | 300x50 |
Maximum Stringer Span (mm) (3) | ||||||
Messmate, spotted gum, blackbutt, kwila etc | F27 | 2900 | 3200 | 3600 | 3900 | 4500 |
Vic ash, Tas oak, jarrah | F22 | 2800 | 3100 | 3400 | 3700 | 4300 |
Spotted gum, blackbutt, ironbark, kwila etc | F17 | 2600 | 3000 | 3300 | 3600 | 4200 |
Douglas fir (nth American) | F11 | 2400 | 2700 | 3000 | 3400 | 3900 |
Radiata, hoop, slash etc | F8 | 2300 | 2600 | 2900 | 3200 | 3700 |
H3 treated pine | F5 | 1600 | 2200 | 2400 | 2800 | 3400 |
NOTES
1. The size of stringers given in the table are nominal sizes. Design allowances have been made for dressing (depth 10 mm max, thickness 5 mm max). Allowance has also been made for trenching stringers to accommodate treads (10 mm max).
2. Timber grading should be in accordance with the appropriate Australian Standard for milled products (ie AS 2792 and AS 4785). The stress grades used for design in accordance with the loading requirements of the BCA are as indicated.
3. Stringer span is the centre line length of the stringer.
Stair Treads (with open flights)
TIMBER TYPE | STAIR WIDTH [TREAD SPAN] (mm) | |||||
Species/ Group | Grade(2) | 750 | 1000 | 1200 | 1500 | 1800 |
Minimum thickness of tread (mm) (1) | ||||||
Messmate, spotted gum, blackbutt, kwila etc | F27 | 26 | 32 | 38 | 48 | 58 |
Vic ash, Tas oak, jarrah | F22 | 28 | 34 | 40 | 50 | 60 |
Spotted gum, blackbutt, ironbark, kwila etc | F17 | 28 | 36 | 42 | 53 | 65 |
Douglas fir (nth American) | F11 | 31 | 40 | 46 | 58 | 70 |
Radiata, hoop, slash etc | F8 | 32 | 42 | 50 | 62 | 73 |
H3 treated pine | F5 | 40 | 46 | 54 | 70 | N/A |
NOTES:
1. The thicknesses in the table are minimum design thicknesses and may not represent commercially available thicknesses.
2. Timber grading should be in accordance with the appropriate Australian Standard for milled products (ie AS 2792 and AS 4785). The stress grades used for design in accordance with the loading requirements of the BCA are as indicated.
The size of treads for internal stairs fully supported by riser boards should be a minimum of 19mm thick for stairs up to 1000 mm wide and 30 mm for over 1000 up to 1800 mm wide. For feature stairs, 30 mm is suggested as a minimum thickness for all treads irrespective of stair width.
Criteria Level: 3
Design issues are driven by the regulatory requirements of the Building Code of Australia. For stairs the BCA is primarily concerned with the safety of users. Design and construction must therefore take into consideration both the strength and durability of materials and components, as well as the ‘geometric' constraints prescribed by the BCA. The following provides a brief summary, for full details refer to the BCA.
- Each flight must not have more than 18 risers or less than 2.
- The nominal dimension of goings and risers of a stair must be constant throughout each stair flight.
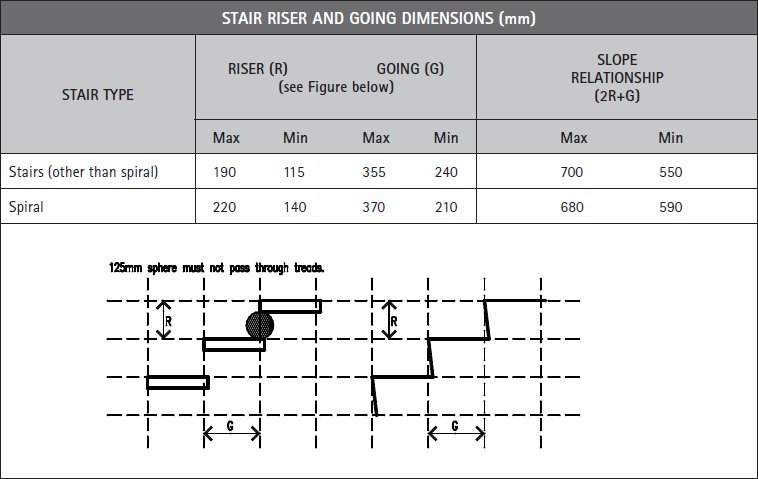
- The riser opening must not allow a 125 mm sphere to pass through between the treads.
- The going (G), riser (R) and slop relationship quantity (2R+G) must be in accordance with the table below
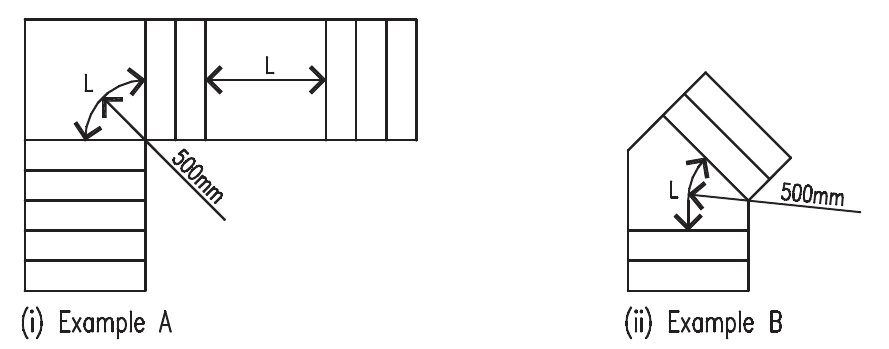
- Landings must be not less than 750mm long and where this involves a change in direction, the length is measured 500mm from the inside edge of the landing. The image below is an example.
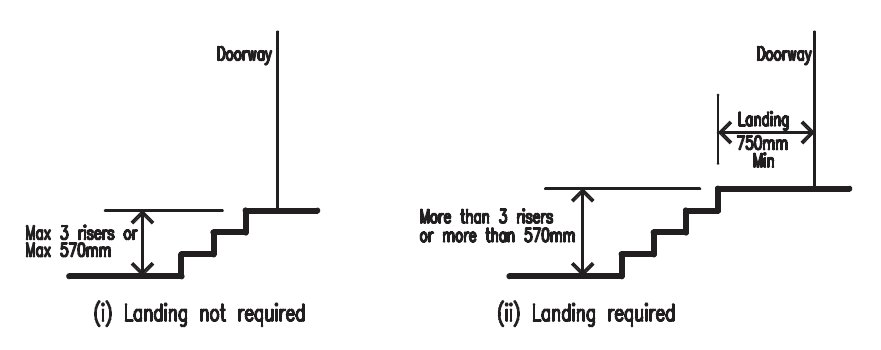
- Landings must be provided where the sill of a threshold of a doorway opens on to a stair that provides a change in floor level or floor to ground level greater than 3 risers or 570mm. The image below is an example.
- Stair treads must have a slip resistant finish or an anti-skid strip near the nose of the thread.
Criteria Level: 1
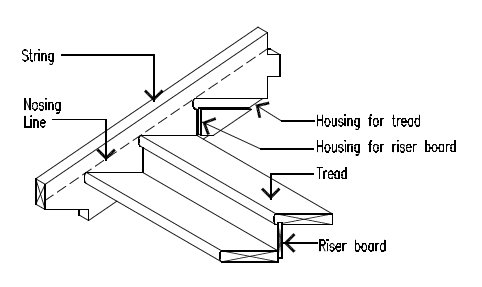
House treads into stringers is the most common type of stair construction. Internal use flights may be constructed with ‘open treads' without risers or ‘closed treads' with riser boards.
As an alternative to timber, metal may be used for stringers. Metal strings are often used in external locations but can also be used for internal stairs. They are available in some states with a ‘stock' rise and going or can be ordered with a specific rise and going. Depending on the application, flights can be configured in various ways as outlined below.
Criteria Level: 1.01
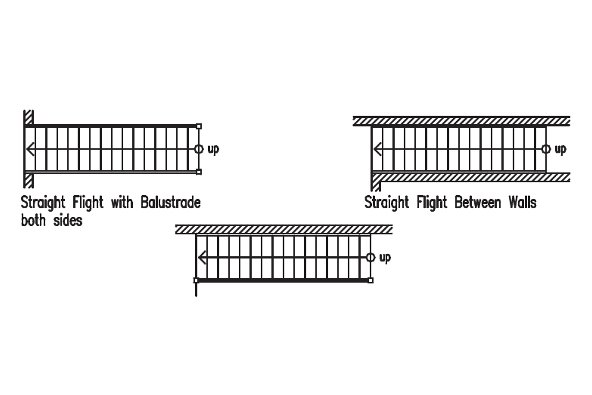
Straight stairs comprise a single flight of stairs with all treads parallel to one another. Common in domestic construction, straight stairs have no landing and may be enclosed between two walls or built against one wall with the other side open with newels and balustrade.
Criteria Level: 1.02
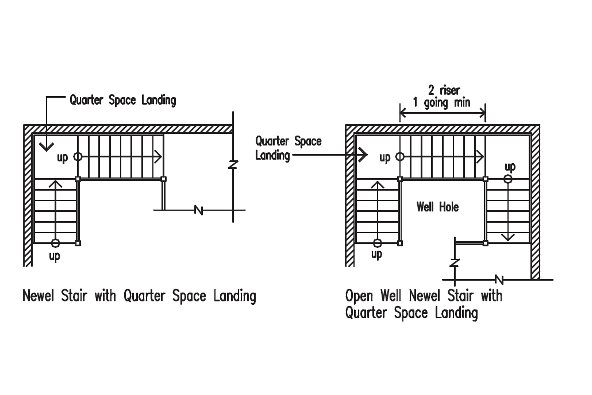
Newel stairs cover all stairs that include newel posts in their construction. The newels support the handrails and/or balustrade and may also support the landings and strings.
An open newel stair is also referred to as an ‘open well stair' or an ‘open well newel stair'. This form of stair has two or more flights that return on each other forming a vertical space called the well.
Criteria Level: 1.03
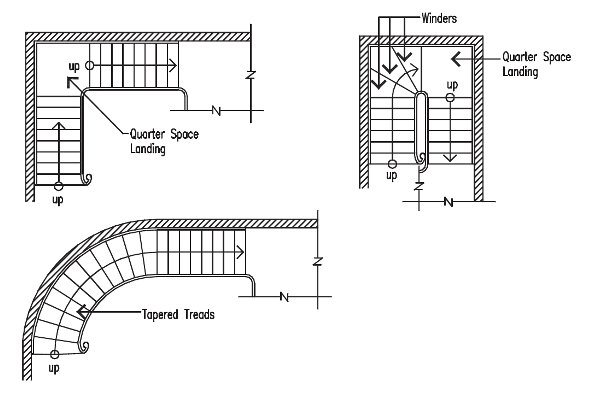
Dog leg stairs are a type of newel stair which have two flights built at 180 degrees to each other from a half-space landing. The outer string of the upper flight is tenoned plumbed above the outer string of the lower flight and both to a single common newel. This type of stair is most common in commercial applications.

Criteria Level: 1.04
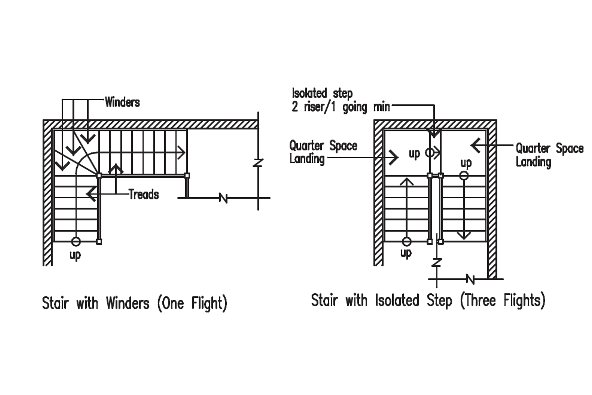
Replacing a quarter space landing, winders are triangular shaped treads used to gain height in a 90° turn stair. A maximum of three winders are fitted per 90° and due to its shape, the centre one is named a ‘kite' winder. As illustrated by the figure below.
Criteria Level: 1.05
Geometrical stairs change direction without the use of newels. The strings and handrails are continuous from floor to floor, with curved portions cut from solid timber staved or laminated.
Criteria Level: 2
Interior stairs are commonly built from treated softwood and durable hardwoods. The selected species will be the main factor determining the overall colour of the stairs. The sapwood of many hardwoods can be much lighter than adjacent heartwood and some timber components may contain both light and dark colours.
Criteria Level: 2.01
For internal use, timber of any durability class is suitable, however hardness may need to be considered for uncovered treads.
Damage to timber stairs may occur due to heavy foot traffic and in particular ‘stiletto-heel' type loading. The selection of a hard timber species ensures improved resistance to indentation and abrasion. Soft timber species, if used for step treads can be expected to indent.
Lower durability species can also be utilised although careful detailing of joints with application and maintenance of protective coatings. Installation of protective shielding on top of exposed timber edges may be necessary.
Criteria Level: 2.02
As stair stringers, treads and posts are structural members, they are required to be stress graded and should be free from any significant strength-reducing features. In addition timber for internal stair construction should be also be seasoned, straight grained and free from any imperfections that may impact durability or serviceability performance requirements. Stringers, treads and posts should meet the following:
Hardwood: AS2082 Timber - Hardwood - Visually stress graded for structural purposes - Structural Grade 1, Minimum F17 seasoned, Appearance grade;
Softwood (Caribbean radiata, slash and imported softwood): AS2858 Softwood visually stress graded for structural purposes, Structural Grade 1, Minimum F11 seasoned, appearance grade;
Hoop pine: AS2858 Softwood visually stress graded for structural purposes - F7 seasoned, appearance grade;
Cypress pine: AS2858 softwood, visually stress graded for structural purposes - F7 seasoned, appearance grade.
Note: In addition, finger jointed timber should comply with AS5068 Timber Finger joints in structural products and laminated timber should comply with AS1328 Glued laminated structural timber.
Criteria Level: 1
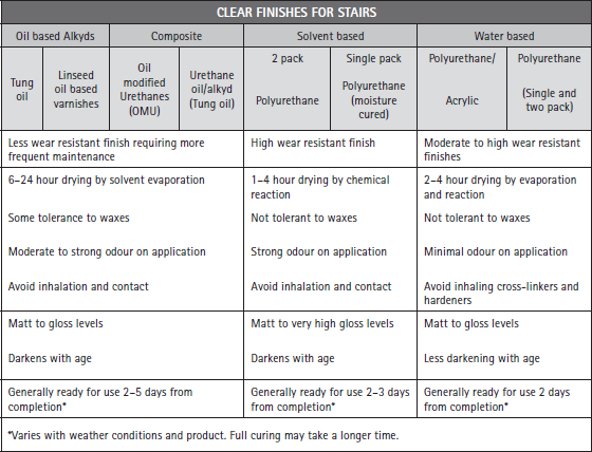
To showcase the natural beauty of the timber, clear polishes or lacquer are often favoured as internal stair finishes. These finishes require extra care to be taken when marking out strings and treads, pencil marks must be kept light and not leave any indentation in the timber. Any nails should be punched a minimum of 3mm below the surface of the boards. The punched nail holes can then be filled with either oil or non-oil based filler. Take care with oil based fillers as they may bleed oil into the timber and affect the colour of the wood surrounding the nail hole. Generally all fillers are slightly darker and this allows the boards to deepen in colour following finishing and UV exposure.
The table below gives a broad overview to typical clear finishes used for internal staircases.
Criteria Level: 1
Stair construction requires high levels of workmanship and accuracy. Note that housed treads can trap moisture so pre-priming before assembly is highly recommended. As per BCA requirements the rise and going must be uniform throughout the flight.
A straightforward internal stair construction procedure is described below.
Criteria Level: 1.01
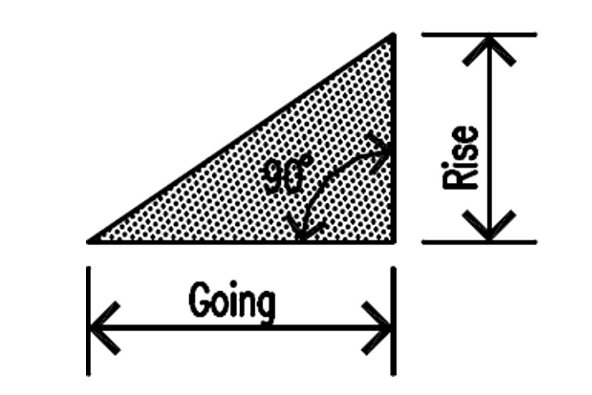
Using a piece of plywood, masonite or similar mark out and cut a pitch board using the going and rise calculated. The image below is an example.
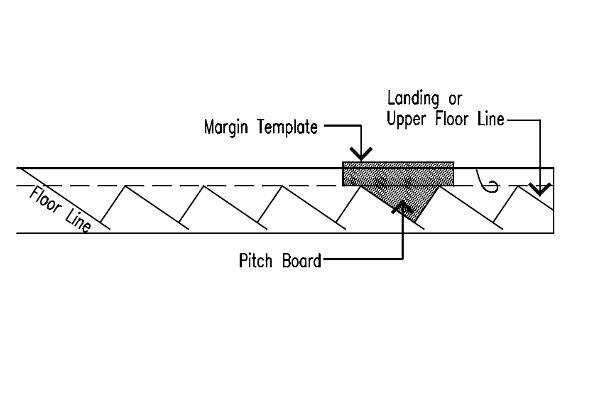
Margin template:
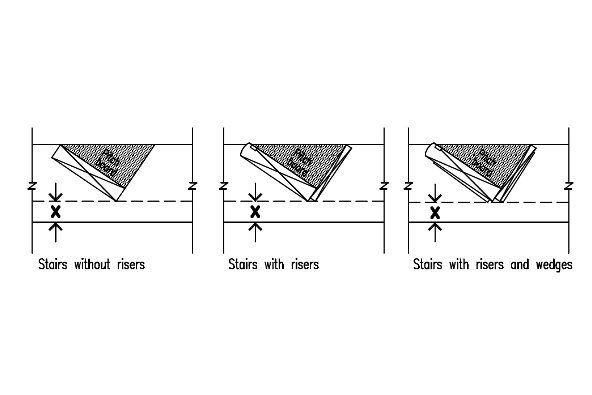
To create a margin template, firstly calculate the width of the margin (X) via the following steps.
- Place the pitch board on the string, with the hypotenuse of the pitch board flush with the string edge.
- Use off-cut pieces of tread and riser board to draw into this trial position, the tread, and also riser and wedges if used. For stairs with riser boards, place the off-cut piece of tread upside down and align the front edge of the riser housing with the edge of the string as shown in the figure below.
- Draw a line just below the tread (or wedges if used) and parallel to the string edge.
- The distance X is the width required for the margin template. The image below is an example.
Once the width is determined, a suitable margin template can be constructed using off-cuts from mouldings.

Criteria Level: 1.02
When marking out stair strings, good practice is to mark out the same hand string first every time. This practice should develop a clearer recognition of the correct positioning of members.
The string handling is determined by looking up the flight, the two strings in one flight are a pair, one left and one right-handed string. Place strings in pairs on saw tools and mark inside face and top edges - consider the effect of any spring or bow. For short flights with one step bolt, place the hollow of the bow in and for longer flights with two step bolts place the hollow of the bow out. String edges should be rounds up (spring up).
Having paired the strings by face and edge marking them, commence marking out the left-hand string. Draw the margin line with the margin template, then using the pitch board, starting from the bottom, mark the position of the floor, the first rise and going.
Before continuing to mark the string, a pair of wind dividers set to distance H in the figure below should be used to mark along the margin line the number of remaining steps in the flight. This action will serve to equalise successive marking with the pitch board and avoid possible loss or gain. The image below is an example.
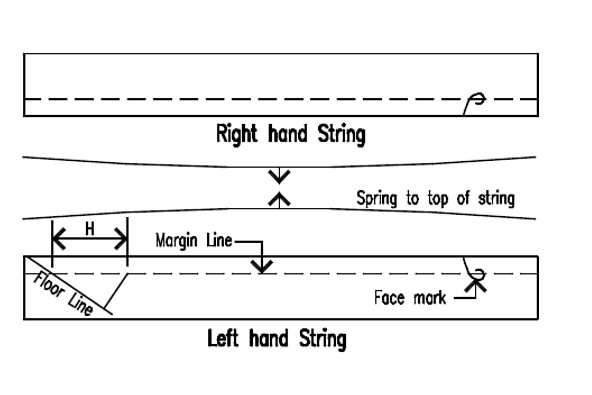
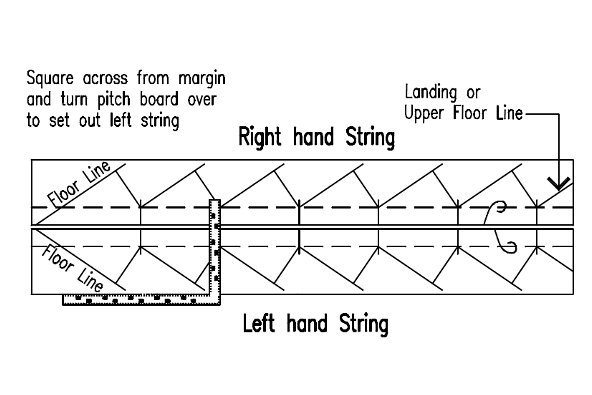
After completing the marking of the first string, place both strings together as a pair and square the points on the margin line across from one to the other. This method will prevent length differences between the two strings, as demonstrated by the figure below.
When satisfied that the initial marking is correct, proceed to complete the marking for the housings. Number each tread and riser. Select treads and risers in numerical order and scribe thickness and shape onto strings.
Using a gauge, mark the housing depth (15mm) onto the back edge of the string. Always gauge from the outside of the tread. This will account for any differences in thickness of the tread particularly when using unseasoned rough sawn timber.

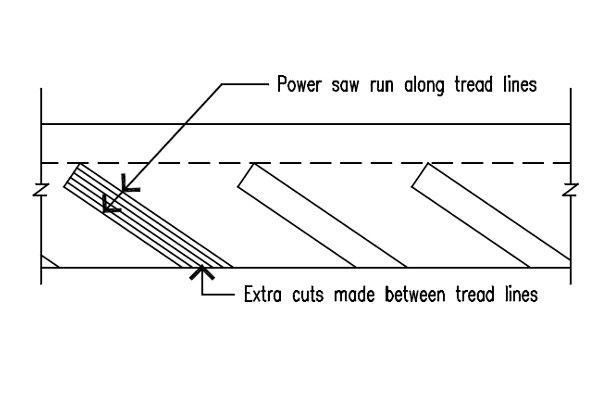
Criteria Level: 1.03
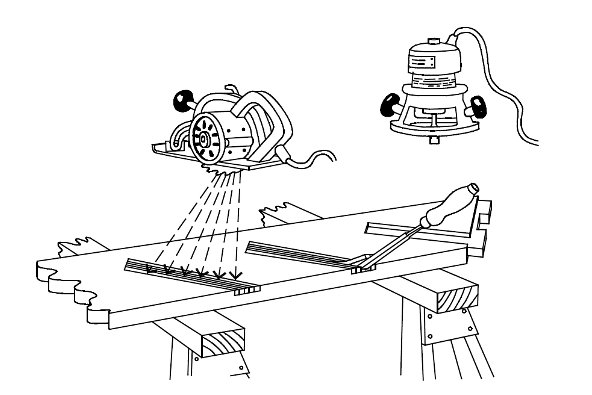
The simplest method to house the strings is to use a power saw to cut along the lines marked for the treads. Set the depth of the saw to the housing depth, 15mm. Run the saw a number of times between these cuts and then use a mallet/hammer and chisel to remove the remaining material.
A router with a template guide fitted can be used and is possibly the best and neatest method for housing strings on site.
Check that each numbered tread fits tightly into its corresponding housing.
Click on the images below for illustrated examples of above.
Criteria Level: 1.04
The marking for the appropriate joints at the ends of the strings can now be completed. The joint used will depend on the type of stair and the structure to which it is being attached.
When newel posts are used, tenons are cut on the end of the strings and the newels morticed to suit.
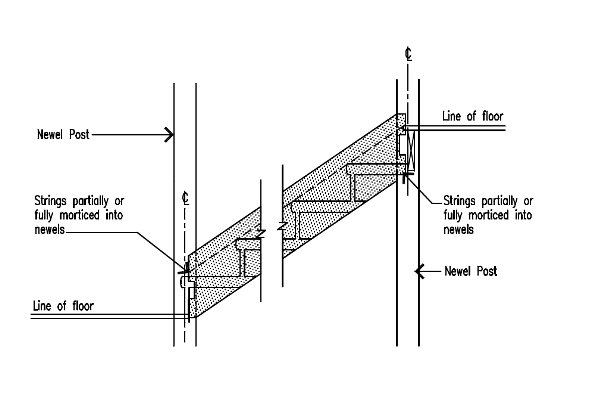
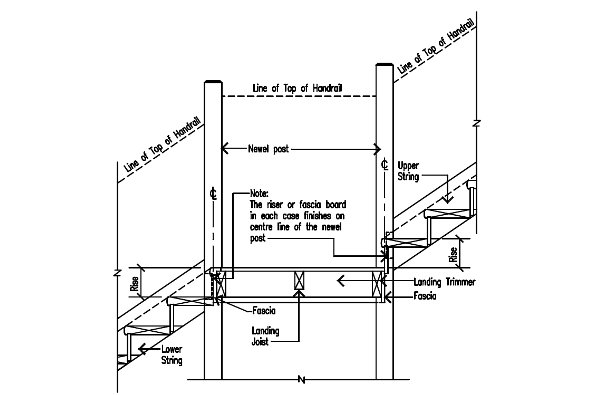
In some cases the faces of the first and last risers should be in the centre of the newel posts.
Cut treads and risers to length and number from bottom to top - make allowance for extra length on bottom tread if specified - remove arrises as required. If risers are being used and the treads are not pre-grooved, groove the treads for risers.
Criteria Level: 1.05
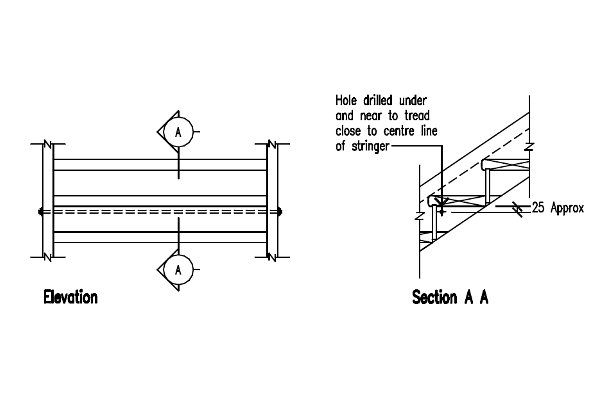
Step bolts are required unless the stairs fit between two walls. Bore the stringers to take 12mm step bolts at a maximum of 1350mm centres. Position them to coincide as closely as possible to the centre line of the string and underside of a tread, leaving a gap between the underside of the tread and the bolt. The image below is an example.
Criteria Level: 2
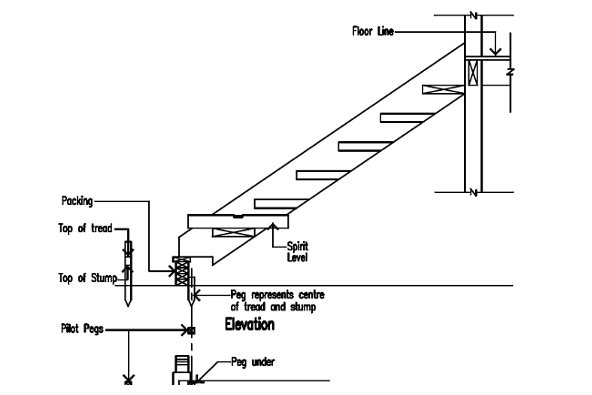
A practical method of finding the position of the stumps under the bottom tread is to take one of the cut strings, place it in position and then level the tread housings with a spirit level. Make any adjustments necessary by packing under the lower end of the string. Use pilot pegs to locate the centre and top of the stumps as shown in the figure below.
Fit top and bottom treads and for flights with risers - the bottom riser only - to strings and nail together. Nail together with three 100 x 4.5 mm nails per joint. Pre-drill if necessary. Fit and loosely tighten step bolts if required. Lift this partly assembled job into position, fitting the stringers to the newels, bearers or joists as required. Fit the remainder of the treads and risers where used and nail with three nails per housing. Tighten the step bolts.
Note: Where possible when using unseasoned timber it's recommended to nail treads and risers temporarily only allowing as much time as possible for shrinkage to take place, after which, nails are withdrawn, joints closed then nailing and punching completed.