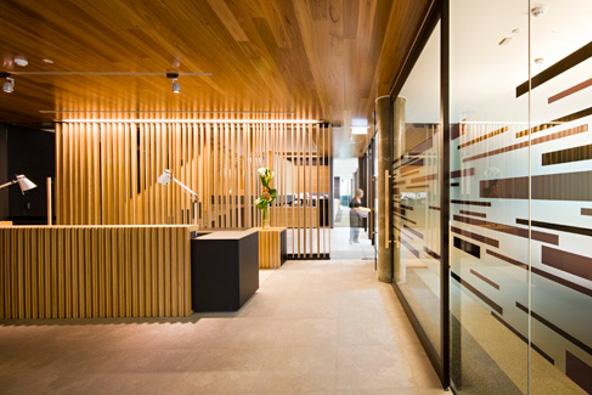
Internal panelling, also known as appearance boards and linings, is not just a practical means of covering one or more walls and ceilings in a building, its inclusion in a room's interior design can generate looks that are both dramatic and stylish. Internal paneling comes as either solid natural timber paneling or as sheets of engineered wood products that provide a durable and hardwearing surface for areas subject to high impact. As they typically function as appearance products they generally have no structural requirements. This guide describes the variety of panelling products available and outlines the straightforward process of installing them.
Criteria Level: 1
The installation process for a straight forward timber paneling project is outlined below.
Criteria Level: 1.01
Solid timber paneling is available in many sizes and profiles and each type of panel will provide a different feel, look and style.
For a straightforward application, measure up the area, verify the coverage provided per panel, calculate minimum need, then add 10% for wastage on horizontal and vertical paneling and 15% for diagonal paneling.
For sheet engineered wood products your supplier will advise on availability and the sizes (length x breadth x thickness) of the sheet products preferred for internal paneling.
Generally sheet products are available in a size of 1200 or 1350 mm wide and about 1800, 2100, 2400 or 2700mm long. Variations occur between suppliers and products.
Criteria Level: 1.02
The first step in the installation process is to confirm the framing service is even and to ensure adequate framing surrounds special fittings, windows, entry and exit points. Recommended maximum tolerance is 3-4mm in a 3m length, anything larger may require the use of battens and packing to level the surface. Usually horizontal paneling can be fixed directly to the studs. Vertical fixing may require extra noggins for nailing.
Criteria Level: 1.03
For horizontal paneling it is recommended to start at the bottom with the groove towards the floor. However if the height of the paneling is not an exact number of boards commence at the top so the make up board can be hidden behind the skirting. Ensure the first board is level before nailing and check for accuracy every five boards. For vertical paneling, start in a corner and position the panel with the groove towards the corner, remembering to leave an expansion gap. If the wall is not square, cut or plane the first board along its length so that the rest of the boards will be vertical. During installation, check boards are vertical every fifth board. The final board may need to be cut or planed to fit the space.
To minimise the effects of colour variation between panels, select and match each panel individually. Tap each board into place using an off cut.
Criteria Level: 1.04
The majority of solid timber and sheet panels, boards and linings are fixed in place by nails. This typically involves a conventional hand driven or gun nail, which may be left visible, hidden or punched and puttied.
Proprietary concealed clips are an alternative for specific types of solid timber paneling. Clips are nailed into place and paneling grooves attached to the clip. This system is preferable for those seeking a nail free appearance. Pre-drilling before nailing is recommended to avoid timber splitting.
Face nailing is a popular, quick and versatile option for both solid and sheet timber paneling. A single nail is usually adequate for narrow boards. For boards over 100mm wide, two nails are recommended.
Secret nailing is an option for several of the profiled solid timber products, however it is not recommended for boards over 100mm wide as it is difficult to achieve solid fixing and thus the risk of cupping is increased.
Screw fixing is only recommended for internal paneling when removable access to services within a wall or ceiling cavity is required. Typically surface screw heads are visually unappealing and difficult to conceal.
Criteria Level: 1.05
Generally adhesive fixing is only suitable for light weight products such as sheet engineered wood products or thin low density natural timber. For solid timber and some plywood there is a risk that the natural oils in the timber will not take to the adhesive. If a nail free adhesive result is desired it is best to seek specific advice from panelling and adhesive manufacturers.
Adhesive fixing alone is insufficient for ceiling paneling.
Criteria Level: 1
Any timber that is used as an internal appearance board, panel or lining, will on occasion be subjected to moderate ‘environmental' changes within its internal environment. These changes result from normal seasonal shifts and from the use of artificial heating and cooling. When subjected to such changes, the timber may take up and lose moisture from, or to, the atmosphere. As the timber takes up or loses moisture it will expand and/or contract. Although the expansion and contraction will normally be almost negligible, the profile and the method of fixing of internal paneling boards does allow for any expansion in the width of the boards during periods of higher humidity, thus preventing cupping and cracking of the paneling.
To minimise the amount of movement post installation, timber paneling should be at, or slightly below the equilibrium moisture content of the room in which it will be installed. This is best achieved by storing the timber in its intended environment for 5 days prior to installation to allow its moisture content to equalise with the room. Materials in buildings that are heated seasonally should have a moisture content range of 10-14%.
Criteria Level: 1.01
Solid timber appearance boards are usually finished with a clear finish, stain or paint. It is good practice prior to installation to pre-cut the boards or sheets to size, sand visible areas as necessary, (apply colour stain if required) and then apply one coat of the clear finish over the entire panel to act as a primer.
It is recommended that other sheet products, such as plywoods and hardboards with porous surfaces, be stacked and the unexposed (back) surface sealed to provide additional control of moisture uptake.
Criteria Level: 2
Timber panels can be installed vertically, horizontally or diagonally. A practical and attractive solution to protect walls in high use areas against typical and recurrent damage is to install vertical timber panels up to a dado height of 900/1000mm.
Timber panels supported directly on framing or battening should be supported at maximum centres of:
- 400mm for boards up to 10mm thick
- 450mm for boards 11mm to 15mm thick
- 600mm for boards thicker than 15mm
Paneling attached over other sheet linings such as an existing wall can use 600mm centres for support.
It is important to consider how you will treat joins at corners and between walls and ceilings. Generally, the joins between walls and floors is covered by a skirting board while joins around window frames and door frames are covered by architrave moulding, hence accurate cutting to fit is not always necessary at those points.
Criteria Level: 2.01
Preference should be given to full length panels but when an end joint is necessary, use a splayed or scarfed joint located over a batten, stud or noggin and stagger them so that they are not beside each other.
Criteria Level: 2.02
Typically all internal paneling products are fixed to a backing framework. This framework may be the building itself - studs, noggins and plates - or it may be battens or furring. When fixing paneling to brick, masonry or concrete walls, horizontal battens or furring strips may be fixed at appropriate spacing after ensuring these provide a flat straight and vertical backing framework.
It is generally recommended that two nails per fixing location be used. Provided the width of the paneling does not exceed 90 mm, wall paneling can also be fixed with secret nailing or proprietary clip systems. Wallboard adhesives are another alternative for fixing wall paneling.
Of these options nail fixing is recommended, as it is better able to accommodate the likely seasonal movement of the timber.
The table below outlines recommended support and fixings:
Paneling thickness | Type of paneling | Support member details | Suggested fixing |
12mm | Wall | 42 x 19mm Seasoned dressed battens fixed at 600mm centres | 40 x 1.6mm BBH nails |
19mm | Wall | 42 x 35mm Seasoned dressed battens fixed at 1150mm centres | 50 x 1.6mm BBH nails |
12mm | Ceiling | 42 x 19 Seasoned dressed battens fixed at 600mm centres | 40 x 1.6mm BBH nails |
19mm | Ceiling | 42 x 35mm Seasoned dressed battens fixed 900mm centres | 50 x 1.6mm BBH nail |
Criteria Level: 3
The Building Code of Australia details regulations that govern the fire performance requirements of materials used in the construction of all building forms.
Fire regulations for materials used in construction of Class 2 to 9 buildings (not single family homes) are covered by Specification C1.10 Fire Hazard Properties. In addition, materials that are used for floor, wall and ceiling coverings in Class 2 to 9 buildings are covered by separate regulations, outlined in Specification C1.10a.
The Fire Hazard Properties that wall and ceiling paneling and boards are required to meet will differ depending on the building type, location within the building and presence (or lack) of a sprinkler service. Material used for wall and ceiling paneling is required to have a Group Number of 1, 2 or 3 and buildings not fitted with sprinklers are required to have a smoke development rate not more than 100, or an average extinction area less than 250m 2/kg.
Generally speaking, Group 3 materials refer to timber products, Group 2 materials are predominately fire retardant timber and Group 1 materials are non-combustible or near non-combustible.
Refer to the WoodSolutions resource on fire performance of timber for further information. There you will find the Warrington fire research report that provides a full assessment of timber floor, wall and ceiling linings to specification C1.10a.
Criteria Level: 1
Before any finish is added finely sand along the grain. It's recommend to test the finish and application method on a piece of unused paneling to confirm the finish will generate the desired result. Always follow the manufacturer's instructions for application of any finish. Many paneling products are finished with a simple clear protective coating, creating a ‘natural' look while others, depending on the décor of the room may be best suited to a painted finish.
Criteria Level: 1
Internal panelling timber products are generally grouped as either solid timber paneling or sheet engineered wood products.
Solid timber paneling is a natural product that is selected for its colour, surface texture and grain. It is available in a number of profiles, with general thicknesses ranging from 9 to 19mm and cover widths from 65mm to over 140mm. Narrower boards of approximately 100mm should be favoured as they allow movement to be distributed across a greater number of joints.
The most common internal paneling profile has a tongue and groove joint. The edges of the joint on the exposed face are chamfered to create a ‘V' when the boards are installed. The V masks a small amount of movement allowable in the tight joints.
An alternative to tongue and groove profiles is shiplap boarding, which has a lapped joint. This can easily accommodate any movement that occurs because the boards are not tightly butted together. Timber paneling can also be installed as board and batten or board on board, both of which accommodate movement easily.
A wide range of wood based manufactured products, known as sheet or panel products, are suitable for internal wall or ceiling paneling. Generally, readily available sheet wall panels include veneer faced plywood and particleboard, and pre-primed masonite. Suppliers offer a wide range of products that utilise these materials.